How to Eliminate Ice Dams with Ice Melting Socks
By Mark J. Donovan
|
|
Mark Donovan of HomeAdditionPlus.com shows how to remove ice dams using ice melt socks in this video.
Ice melt socks are a quick and easy way to eliminate ice dams without destroying your roof. Removing ice dams by chipping away at them with a hammer is fraught with problems including damaging your roof’s shingles and creating water penetration problems.
Ice melt socks on the other hand are easy to make, easy to install, and are extremely effective in removing ice dams and the damaging effects associated with them.
To make ice melt socks simply pour 2 to 3 lbs of non-corrosive and non staining ice melt into nylon stockings. Then tie off the ends of the nylon stockings to complete their assembly.
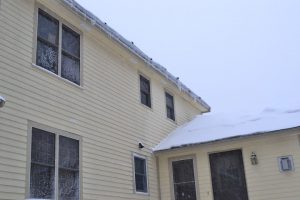
| Then place the ice melts socks every 6 to 8 feet along the roof eaves with the ice dams. The ice melt socks should be placed perpendicular to the roof eaves and ice dams. In just minutes the ice dams begin to melt channels into the ice dams.
As the channels are formed snow melt water from higher up on the roof begins to drain out the channels created by the ice melt socks, thus eliminating the threat of water damaged caused by ice dams. Over time the ice dams will also shrink. |
 |
Ice melt socks can last several weeks, and possibly even the entire winter season depending upon the winter weather conditions. If necessary you can replenish the ice melt socks with more ice melt.
Ice melt socks are an ideal triage solution for when you home is suffering from ice dams. However, the best solution for eliminating ice dams is preventing them in the first place.
| To prevent ice dams make sure your attic has adequate insulation for your region of the country, and secondly make sure you attic has proper ventilation. Proper ventilation should include both soffit vents and ridge vents. Make sure the attic insulation is not blocking the soffit vents.
The general rule of thumb is that there should be 1 square foot of attic ventilation for every 300 square feet of finished ceiling space below the attic. If there is no vapor barrier (paper face) on the insulation surface facing the finished ceiling, then there should be 1 square foot of ventilation for every 150 square feet of finished ceiling space. |
 |
The ventilation should be split 50/50 between soffit vents and ridge vents.
For more help on Shingling Your Home’s Roof, see HomeAdditionPlus.com’s Asphalt Shingle Roofing Bid Sheet. The Asphalt Shingle Roofing Bid Sheet will help to ensure that your roof won’t end up with a blue tarp over it and a dumpster sitting in your yard for weeks as you wait for the roofing contractor to come back and finish roofing your home.
Asphalt Shingle Roofing Cost Estimator
Related Roofing Information
- The Importance of Soffit Vents in Preventing Ice Dams
- The Importance of Ridge Vents in Preventing Ice Dams
- How to Shingle Roof Valleys
Additional Roofing Resources from Amazon.com
 |
 |
 |
 |
Roofing Price Quotes For FREE, No Obligation!
Fill out our 3-5 minute quick and easy form, and receive a free price quote on roofing from one of our prescreened and licensed roofing contractors. This process is free and there is no obligation to continue once you receive your roofing price estimate.