How to Create a Smooth Transition from the Backer board to a Tub
By Mark J. Donovan
|
|
When installing backer board around a tub, the best solution is to use furring strips attached to the wall studs. Attach the furring strips perpendicular to the wall studs at a height where the underside of the tub flange area rests on the top of the furring strips and the bottom of the tub rests on the floor. Make sure to secure the furring strips to the wall studs with either 2 inch screws or 8d penny framing nails.
Next apply an adhesive to the top edges of the furring strips and on the subfloor where the tub will rest. Then slide the tub into place and let the adhesive set up. Typically it will take 24 to 36 hours for the adhesive to fully setup.
|
After the adhesive has fully setup install a vapor barrier over the wall studs. Use either plastic or felt paper. Make sure to overlap the plastic or felt paper sections by at least 6 inches if you need to use multiple pieces.
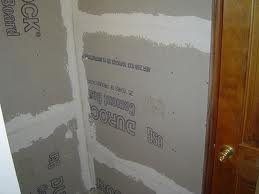
| Installing Backer Board around Tub
Next, fasten the backer board to the wall studs, with the rough side facing towards the tub. Fasten the backer board to the wall studs with non-corrosive nails or screws, such as Rock-On screws. Place screws or nails every 6 to 8 inches along the length of the wall studs. Then tape and mud the backer board seams with a modified thinset mortar and an alkaline resistant fiberglass mudding tape. |
 |
When attaching the backer board to the wall studs bring the backer board down nearly even with the tub flange lip. You can then apply a bead of waterproof caulk between the tub lip and the backer board. Then, when tiling the backer board you can bring the tiles down over the tub lip and apply a sealant between the tub edge and the ceramic tiles.
| If you prefer to overlap the tub lip with the backer board a little, then back cut the bottom back edge of the backer board so that you maintain a smooth transition from the backer board to the tub. This will prevent the backer board from bowing inwards near the tub edge.
Make sure when installing ceramic tile above a tub or shower enclosure to use a modified thinset mortar. Do not use mastic for fastening the tiles to the backerboard. Over time the mastic will loosen and the tiles will begin to fall off into your tub, and potentially crack or damage it. Alternative Methods for Installing backer board around a Tub Another method for installing backer board around a tub is to first notch the wall studs where the tub flange will intersect the wall studs, before installing the tub. |
 |
This way the backer board can be fastened to the wall studs and over the tub flange without causing the backer board to bow inwards.
Another alternative approach for installing backer board around a tub is to first fasten thin shims to the wall studs before attaching the backerboard.
For help on your bathroom remodeling project, see my Bathroom Remodeling Bid Sheet. The Bathroom Remodeling Bid Sheet provides a request for quote checklist section that you can provide to prospective bathroom remodeling contractors. It also includes a comprehensive bathroom remodeling cost breakdown table, in Microsoft Excel format, that allows the contractor to include his projected remodeling costs for every phase of the project.
Related Information
- How to Fix a Leaking Showerhead Faucet
- How to Install a Bathtub Insert
- How to Easily Clean Shower Doors
Additional Bathroom Remodeling Design Resources
 |
 |
Get Free Bathroom Remodeling Price Quotes with No Obligation!
Fill out our 3-5 minute quick and easy form, and receive a free price quote on bathroom remodeling from one of our prescreened and licensed bathroom remodeling contractors. This process is free and there is no obligation to continue once you receive your bathroom renovation price estimate.