Self Leveling Compounds are Ideal for Preparing Subfloors for Ceramic Floor Tiling
By Mark J. Donovan
|
|
When to use Self Leveling Compound
Self leveling compounds for Tile are the perfect solution for leveling out uneven subfloor surfaces that you plan to tile. Concrete floors are notorious for having high and low spots and not being level. Tilling over them, without first applying a self leveling compound, is fraught with problems. The ceramic tiles will end up not sitting evenly over the concrete floor, and thus will be susceptible to breaking or becoming loose over time. |
In addition, the unevenness in the floor will show through on the tiled floor surface. Tiles will have high or low corners and grout lines will look uneven. Wood subfloors can also be a problem. Floor joists that may have twisted or flexed over time may cause the plywood subfloor to become uneven.
So if you have a ceramic floor tiling project, and the subfloor is not perfectly level, apply a self level compound to the subfloor first and allow it time to fully cure. As the name implies, self level compounds will fill in the voids in the subfloor surface such that it becomes smooth and level.
Preparing a Subfloor for the Application of Self Leveling Compound
Prior to applying leveling compound on the subfloor first make sure that the subfloor is firmly fastened down and rigid, and that it has been swept and vacuumed of any debris and dust. If the subfloor has any level of deflection when you stand on it, both the self leveling compound and floor tile will end up cracking over time. Note that the self leveling compound will add no structural rigidity to the subfloor. Similarly, if there is any debris or dust left on the subfloor the self leveling compound will not adhere well to the subfloor surface.
After sweeping the subfloor surface go back and vacuum it with a shop vac, such as the Shop-Vac 962-16-00 16-Gallon Wet/Dry Vacuum. Then use a slightly damp mop to wash the subfloor surface. Again, it is critical that there is no loose material on the subfloor prior to applying the self leveling compound.
| Application of Primer to Subfloor Prior to Applying Leveling Compound to Plywood or Concrete
In order to ensure that the self leveling compound will bind well to the concrete or plywood subfloor, you first need to apply a special latex primer to the subfloor surface. You can either roll or brush the primer on. When applying the primer make sure that you work it in to every nook and cranny of the subfloor surface. After applying the primer allow it to dry fully before pouring the self leveling compound onto the subfloor. |
 |
Mark the Low Areas on the Subfloor
Using a framing square or level, slide it along the surface of the subfloor to identify the low areas. Mark or circle the low areas with a pencil. You will apply the self leveling compound to these areas first.
Prepping the Self Leveling Compound
It is important to understand that self leveling compounds set up fast. It typically sets up in ten to twenty minutes. Thus you have to be quick with the mixing and application of it. So make sure you have all of your tools and materials near the jobsite prior to mixing the water with the self leveling compound.
| Since directions can vary with self leveling compounds make sure to read and follow the directions carefully on your package of the material.
Also keep in mind that you should not breathe in self leveling compound dust. As a result, make sure you adhere to all of the safety precautions listed on the directions. For example, you may want to wear a mask and gloves when mixing up the self leveling compound, and you should always were safety goggles. |
|
Since time is of the essence when working with self leveling compounds you may want to use a power drill and mixing hook to speed up the mixing process. The DEWALT DC759KA Heavy-Duty 18-Volt Ni-Cad 1/2-Inch Cordless Drill/Driver Kit is ideal for mixing up self leveling compounds. Mix the self leveling compound in a clean 5 gallon bucket with cold water. As a matter of fact, preferably use ice water, minus the ice, when mixing up the self level compound. The cold ice water will help to extend the working time of the self leveling compound mixture. Make sure the mixing hook hits the sides of the bucket when mixing it to ensure that all of the self level compound material gets thoroughly mixed with the water.
You’ll know the self leveling compound mixture is ready when it has a loose soupy consistency to it. If it is too thick the curing time will be shortened, and if it is too loose you’ll have trouble leveling out the subfloor with it. Try to limit the mixing time to less than three minutes to ensure you have sufficient enough time to pour and spread it.
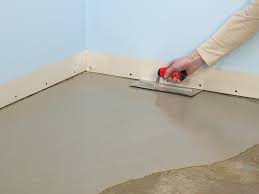
| Application of Self Leveling Compound
After you have achieved the proper mixture consistency, immediately begin to pour it onto the subfloor. However, first pour it into the low areas that you marked with your pencil. After pouring a little bit of the self leveling compound mixture into the low spots allow it to spread out a bit on its own. Then use a trowel or squeegee to flair and smooth it out. |
 |
Again, you’ll need to work fast as you only have around ten to fifteen minutes to work with it. Then continue to apply the self leveling compound to the rest of the subfloor surface area.
After you’ve made the mixture do not attempt to thin it out to stretch the material or extend its working time. This will lead to the self leveling compound not curing properly, which will result in eventual cracking. If it cracks, the ceramic floor tiles will eventually loosen up.
In less than an hour the self leveling compound will have set up and be firm to the touch. After four hours it will be hard enough to walk on. However, hold off for 24 hours before tiling the subfloor to ensure that the self leveling compound has fully cured.
Clean Up of Tools after Applying Leveling Compound
Immediately after pouring self leveling compound and spreading it wash your tools and bucket out thoroughly. If you fail to do so they will be unusable for the future, as the self level compound will be glued solid to them.
So that’s all there is to it to applying self leveling compounds to subfloors. Good luck with your ceramic floor tiling project.
For information on installing a shower pan membrane liner for a ceramic tile shower, see the Shower Pan Membrane Liner Installation Ebook from HomeAdditionPlus.com. The Shower Pan Membrane Liner EBook will quickly teach you the step-by-step process for installing the shower pan membrane liner correctly. It includes instructions on framing the shower stall, pouring the pre-slope and shower base mortar, and installing the shower pan membrane liner.

See HomeAdditionPlus.com’s Ceramic Tile Calculator
See my “How to Tile a Custom Ceramic Tile Shower” Ebook to learn how to tile your own shower: For a detailed set of instructions on tiling a shower floor and walls, including pictures for every step in the process, see my “How to Tile Custom Ceramic Tile Shower Ebook”.
Related Information Applying Leveling Compounds and Tiling
- Leveling Compounds for Tiling Floors
- How to Ceramic Tile a Floor Like a Pro
- The Importance of Using an Underlayment when Tiling a Floor
Additional Ceramic Tile Resources from Amazon.com
 |
 |
 |
Get Free Bathroom Remodeling Price Quotes with No Obligation!
Fill out our 3-5 minute quick and easy form, and receive a free price quote on a bathroom remodeling project from one of our pre-screened and licensed bathroom remodeling contractors. This process is free and there is no obligation to continue once you receive your bathroom addition price estimate.