Detailed Instructions on How to Build a Shower Pan Liner that will be Leak Free
By Mark J. Donovan
|
|
At the heart of every custom ceramic tile shower floor is a mortar based shower pan, or shower base. A shower pan is essential for ensuring a leak free tile shower floor. In the following paragraphs this article will explain how to build a shower pan the right way, the way that won’t leak and cost you a fortune in repairs.
Building a shower pan can be done by most handy do it yourself homeowners, however it is important to use the right tools and materials, and obtain some upfront knowledge. |
If built properly a shower pan should be leak free and last indefinitely. If done incorrectly, you could be in for quite a mess.
Installing a Mortared Shower PanBefore going over how to build a shower pan, it is important to first understand why it is even necessary. Tile grout is porous, even when it is sealed. Consequently water in a shower stall can seep through it and find its way to lower levels in the home. If this water is not channeled to the shower drain properly, damage to the sub floor and lower level ceilings will occur. |
 |
What is a Concrete Shower Pan
A concrete shower pan is a waterproof system that channels water into the shower’s drain. It in involves a shower pan membrane liner that is sandwiched in between two layers of concrete. It is typically used when tiling a shower, and where the floor tile sits on top of the shower pan. The concrete shower pan can be installed on a concrete slab floor or a wood subfloor.
Watch the below video for detailed instructions on how to install a mortar shower pan liner.
History of Installing a Mortar Shower Pan
In earlier years a tile shower pan liner was constructed using copper, lead or tar to seal the concrete shower pan. However, history has shown that over time these materials fail due to corrosion. Newer materials are now available, such as flexible plastic type shower pan membrane liners that replace these older materials.
Building a tile shower pan liner is a little complicated. However in the following sections I will highlight the process for properly installing one. For a more detailed description see my “How to Install a Shower Membrane Liner Ebook”. This eBook provides step-by-step instructions on how to install a mortar shower pan, and includes instruction pictures for every step in the process.
Tools and Materials Required to Build a Shower PanThe tools required for building a shower pan include: mortar trowel, bucket, utility knife, hammer, spirit level, 2 or 4 foot level, staple gun, tape measure, wire cutters and roofing nails. The materials required for building a shower pan include: a waterproof shower membrane liner, mortar, felt paper, wire lath, backer board, and shower pan membrane liner adhesive. Shower Pan Membrane Liner ChoicesBasically you have two types of shower pan membrane liners to select from. |
 |
Each is made from different plastic like materials. The first waterproof membrane liner is constructed out of a material known as CPE (Chlorinated Polyethylene). It is a flexible plastic material that can be easily hand molded and maintain its configured shape. It is the most commonly used waterproof membrane liner.
The second membrane liner option is manufactured using a PVC (Polyvinyl Chloride) material. It is more difficult to work with as it is stiffer and tougher to mold into shape. Both waterproof membrane liners can be purchased at your local home improvement center.
Shower Pan Site PreparationBefore building a shower pan the shower area needs to be constructed. Typically 2×4 framing is used to construct the walls and 2×6 blocking plates are installed between the vertical members at the base of the shower area. The blocking plates provide a nailing surface area to attach the shower pan membrane liner to. For the shower opening curb, sister 2 or 3 2×4’s together to obtain a 3 to 4.5” inch high shower entrance curb. |
Use this eBook to get step-by-step instructions with pictures on how to install a mortar shower pan. |
Building the Shower Pan Pre-Slope / Shower Base
It is important to have the water drain towards the adjustable drain assembly in the center of the shower area. Consequently it is necessary to build a mortar based pre-slope that will funnel water towards the drain.
It is also very important to have the correct shower pan mortar bed thickness, which I discuss in more detail below.
To install the pre-slope mortar bed first place a piece of felt material in the bottom of the shower area. It should be cut properly to fit the entire shower floor and up the sides of the shower walls by approximately 6-8 inches. Fasten the felt to the walls of the shower with staples.
|
Now calculate a measurement of how high the mortar needs to rise up against the shower walls to create the proper drain slope. Again, it is critical to create the proper shower mortar bed thickness and slope so read the next few sentences very carefully. For best drainage, use ¼ inch in height for every 12 inches of run from the drain center. Also keep in mind that the mortar thickness in the pre-slope should be ½” to 1” thick. |
 |
For example, if the thickness of the pre-slope layer is to be ½” thick, and if the run distant from the drain center to the shower wall is 2 feet, the height of the pre-slope mortar bed on the shower walls should be 1”.
Using a 2 or 4 foot level, mark a line on the felt paper at the appropriate height, based upon your calculations. Continue to draw this line all around the walls of the shower stall, as this line will act as your reference for the finished height of the pre-slope mortar.
Next, use your utility knife to cut an opening in the felt paper for the drain assembly to slip through.
| After the felt has been installed and marked, next place wire lath in the base of the shower stall. Again, make sure you cut an opening in the wire lath for the drain assembly to slip through.
The wire lath acts as reinforcement to the mortar, akin to rebar, and helps to prevent mortar cracks. The wire lath should also go up and over the shower curb and fastened in place. |
|
Next mix up some mortar and pour it into the base of the shower floor. The mortar is made up of Portland cement and sand and should be mixed with water to create a relatively stiff mud material.
Use your mortar trowel to achieve the proper pre-slope, working from the drain area outward, to the height marked on the felt along the shower walls. Use your Spirit level to help in maintaining the proper slope evenly throughout the shower floor area.
Let the mortar set up for about 24 hours before going on to the next stage.
Installing the shower pan membrane liner
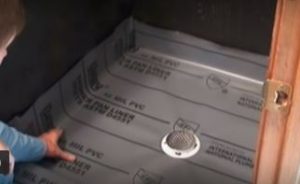
Place the shower pan membrane liner into the shower base area. The liner should be cut to size so that it travels up the sides of the shower walls by approximately 6 inches. Also make sure that the membrane liner can wrap up and over the front curb of the shower pan.
If you are building a large shower pan, then you may need to fuse together two pieces of membrane liner. Make sure you use the membrane liner manufacturer’s recommend adhesives for gluing the pieces together.
Mold and fold the membrane liner into place around the base of the shower pan.
|
|

See this article on how to frame a shower pan base. |
Fasten the membrane liner to the sides of the shower frame initially using staples and then with roofing nails. Make sure, however, that the staples and nails are placed no lower than 4 inches above the base of the shower pan.
Finally, cut a hole in the membrane liner for the drain opening and install (with bolts) the drain flange to the base of the drain assembly.
Install Backer board on Shower Walls
Once you have fastened the membrane liner in place, fasten backer board to the shower walls. The backer board should run down to the floor of the shower pan.
Installing the Base Mortar Layer into the Shower Pan
With the waterproof membrane liner and backer board installed, you can now pour the base mortar layer over the shower liner.
First, however, install the adjustable drain assembly into the shower drain and adjust the height by simply rotating clockwise or counterclockwise.
|
The base mortar layer should be approximately ½ to 1 inch thick. Since the shower floor already has a pre-slope, just apply a base mortar layer that has an even thickness throughout the shower floor area. Again, use your 2 or 4 foot level to mark the finished height along the shower walls to help as a guide when troweling the mortar evenly throughout the shower floor. |
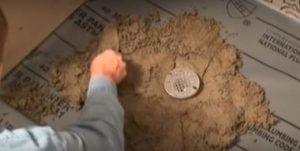 |
You may also want to use your spirit level during this process to help maintain an even application of the mortar and pre-slope.
If necessary also adjust the drain assembly height as well, however keep in mind that the finished height of the shower will also include the additional thickness of the ceramic tile.
Also, trowel the mortar up and over the shower pan curb, however make sure the curb has a slight lean such that water will drain from the curb into the shower pan.
Let the mortar set up for 24-48 hours before installing the ceramic tile. While the base mortar is setting up, occasionally rotate the shower drain assembly to ensure that it can be adjusted later for the finished ceramic tile height.
For information on installing a shower pan membrane liner for a ceramic tile shower, see the Shower Pan Membrane Liner Installation Ebook from HomeAdditionPlus.com. The Shower Pan Membrane Liner EBook will quickly teach you the step-by-step process for installing the shower pan membrane liner correctly. It includes instructions on framing the shower stall, pouring the pre-slope and shower base mortar, and installing the shower pan membrane liner.

See HomeAdditionPlus.com’s Ceramic Tile Calculator
See my “How to Tile a Custom Ceramic Tile Shower” Ebook to learn how to tile your own shower: For a detailed set of instructions on tiling a shower floor and walls, including pictures for every step in the process, see my “How to Tile Custom Ceramic Tile Shower Ebook”.
Related Information How to Build a Mortar Shower Pan
Additional Ceramic Tile Resources from Amazon.com
 |
 |
 |
Get Free Bathroom Remodeling Price Quotes with No Obligation!
Fill out our 3-5 minute quick and easy form, and receive a free price quote on a bathroom remodeling project from one of our pre-screened and licensed bathroom remodeling contractors. This process is free and there is no obligation to continue once you receive your bathroom addition price estimate.