Step by Step instructions on how to Shingle a Roof
By Mark J. Donovan
|
|
Shingling a Roof is a major undertaking for a homeowner and extreme caution is required. This said, a Do It Yourselfer homeowner can shingle a roof on their own home with a little knowledge and the right tools.
Required Roofing Tools for Shingling a Roof In order to shingle a roof properly and safely the following tools are needed: Ladders, Roof Jacks, Hammer, Carpenters Knife, Chalk Line, and preferably a compressor or nail gun. |
Estimating Roofing Shingle Materials for Shingling a Roof
Typically the roof is measured in squares, where a “square” represents 100 square feet. There are eighty roofing shingles in one square.
However, when you go to your local home improvement store roofing shingles are usually sold in bundles. Usually three bundles of roofing shingles equal one square, however this can vary slightly pending the shingle style.
Measure the area of your roof (length x width) and divide by 100 to get the number of squares required. Then multiply this number by three to get the number of bundles of roofing shingles required for the job. Add an additional 10-15% for spare, leaning toward the 15% if your roof has hips and valleys.
| Drip edge, ice and water shield, asphalt paper, flashing, roofing nails, and hip and ridge vents will also be required for shingling a roof. The Drip edge comes in various lengths.
Measure the outside perimeter of the roof to calculate the drip edge required. The ice and water shield, asphalt paper and flashing come in roles. Use your roof square area calculation for determining your asphalt paper requirements. |
 |
Typically only one or two courses of ice and water shield is required along the bottom/eave of the roof and in the valleys. Calculate 2 times the length of the roof and valleys to estimate the amount of ice and water shield required.
Typically each roofing shingle will require 4-6 roofing nails and flashing usually comes in 16” wide roles or 6×6 or 8×8 square inch steps. Step flashing is typically used around chimneys, dormers and side wall junctions. Hip and Ridge vent will vary with local building codes, however a rough estimate would be to measure the length of your roof’s hip and ridges and take 75% of this figure for calculating the amount of vent required.
You should now be able to fairly accurately calculate the cost of material for shingling your roofing.
Installing the Drip Edge before Shingling a Roof
Nail the Drip edge around the entire outside perimeter of the roof.
| Apply Ice/Water Shield Membrane & Asphalt Paper before Shingling a Roof
Apply the ice and water shield material such that it is flush with the drip edge. If the climate in your area has harsh winters and/or significant annual rainfall, add a second course of ice and water shield for added protection. You should also add the ice and water shield membrane in the valleys. |
 |
Next apply the asphalt paper to the entire roof, starting from the bottom and working towards the ridge. Make sure each course of asphalt paper overlaps the lower row by several inches (effectively shingling with the asphalt paper).
Install metal flashing before Shingling a Roof
Install metal flashing in all of the valleys of the roof. Step flashing around chimneys and dormers will be added as the roofing shingles are installed.
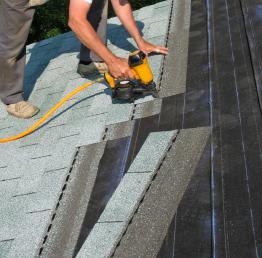
Installing the Roofing Shingles
Start the shingling at the bottom of the roof (or at the eaves). Lay a starter course of roofing shingles such that the bottom edge of the roofing shingle lines up flush with the drip edge. The starter strip is a “tabless” roofing shingle that you make from the regular roofing shingles using your carpenter’s knife.
Lay your next course of full roofing shingles over the first course, staggering the starter joints from the first course to prevent water penetration.
Note: Sometimes you may want to start with a full or a partial roofing shingle at one end. In either case, you want to try to avoid small roofing shingle pieces at the far end of the roof. To prevent this, divide the length of the roof by the length of a full roofing shingle and assess how much of a shingle length you want to start with. Ideally you do not want to have pieces smaller than 12”.
| Use a Chalk Line when Shingling a Roof
To ensure your shingle courses run straight use a chalk line, such as the Tajima CR202B-P Chalk-Rite II Ultra-Thin Snap Line with Triple Speed Rewind and 1.4-ounce Bottle Blue Chalk-Rite Chalk. Measure the finished reveal on your shingles. Usually this is about 5 inches. Then make marks every 5 inches on the gable ends of the roof. Snap a chalk line between the gable ends at each pair of marks all the way up the roof. This will ensure that you shingles run true and straight as you progress up the roof with the courses. |
Use this roofing installation checklist to save time and money on your roofing project. |
Vertical lines should also be snapped every 3 to 6 feet to ensure your tabs maintain alignment.
Use of Roof Jacks when Shingling a Roof
After 3 or 4 courses of roofing shingles have been installed using ladders, roof jacks, such as the American Manufacturing Model #3000 10″ Adjustable Roofing Bracket, may be necessary to access the upper courses.
Roof jacks are steel brackets that hold planks in position for you to stand on. The roof jacks should be securely nailed through the decking and into rafters to ensure that they will support your weight.
Shingling a Roof – Valleys, Chimneys, Skylights and Dormers, and Step Flashing
Shingling the valleys and installing flashing requires extra care. The roofing shingles, typically coming from two intersecting courses when entering a valley, need to overlap each other such that no water penetration occurs.
Skylights, chimneys and dormers must be step flashed (step flashing is interleaved with each course of shingles) to ensure water is kept from penetrating the roof.
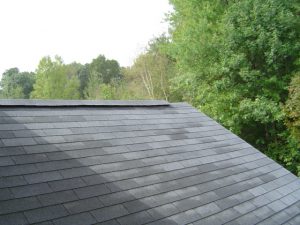
Adding the Ridge Vent and Caps
To complete the shingling of a roofing project, ridge vents need to be installed. These are nailed to the top of the ridge and then capped.
The ridge cap prevents water from entering the home via the ridge vent, while still allowing the house to breath. The ridge cap is constructed out of individual roofing shingle tabs that have their unfinished corners cut off at 45 degree angles. Each modified roofing shingle tab, is nailed such that it overlaps the previous piece as you work your way down the length of the ridge vent.
For more help on Shingling Your Home’s Roof, see HomeAdditionPlus.com’s Asphalt Shingle Roofing Bid Sheet. The Asphalt Shingle Roofing Bid Sheet will help to ensure that your roof won’t end up with a blue tarp over it and a dumpster sitting in your yard for weeks as you wait for the roofing contractor to come back and finish roofing your home.

Asphalt Shingle Roofing Cost Estimator
Related Roofing Information
Additional Roofing Resources from Amazon.com
 |
 |
 |
 |
Roofing Price Quotes For FREE, No Obligation!
Fill out our 3-5 minute quick and easy form, and receive a free price quote on roofing from one of our prescreened and licensed roofing contractors. This process is free and there is no obligation to continue once you receive your roofing price estimate.