How to Replace a Toilet Tank Fill Valve that has Malfunctioned
By Mark J. Donovan
|
|
A toilet tank fill valve plays an important role in a toilet. It is the mechanism that fills the tank with fresh water after you flush it.
Unfortunately, and inevitably, a toilet tank fill valve will malfunction over time. Sometimes the malfunction manifests itself by a constantly running toilet and other times it may not completely fill the tank. And in some cases, the valve may oscillate between off and on and cause a loud humming sound in the tank. |
When any one of these types of malfunctions occur it is best to simply replace the toilet tank fill valve. A toilet tank fill valve costs around $10 and you can replace one yourself in about 30 minutes.
Step by Step Instructions on How to Replace a Toilet Tank Fill Valve
Removing the Old Toilet Tank Fill Valve
To replace a toilet tank fill valve, first shut off the supply line to the toilet tank. Then flush the toilet to drain as much water as possible out of the toilet tank.
Once you’ve flushed out as much water as possible from the toilet tank, use a sponge or towel to sop up the residual water in the tank. Have a bucket handy to squeeze out the soaked sponge or towel.
| After removing any residual water from the tank, disconnect the water supply line from the base of the toilet tank. If you’re lucky the supply line nut will be able to be screwed off with just your fingers. If it is too tight you may need to use an adjustable pair of pliers to loosen it.
With the supply line disconnected from the toilet tank, next remove the large plastic nut that sits underneath the toilet tank and that holds the existing toilet tank fill valve in place. Again, you may need a pair of adjustable pliers to remove this nut. |
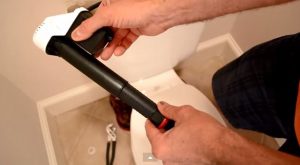
Watch this video on how to replace a toilet tank fill valve. |
After removing the large plastic nut the old toilet tank fill valve should be able to be lifted out of the toilet. You may need to unclip the small thin hose that connects between the toilet tank fill valve and the overflow pipe.
Replacing Toilet Tank Fill Valve
With your old toilet tank fill valve in hand visit your local home improvement center and find a similar replacement toilet tank fill valve. Many replacement toilet tank fill valves are adjustable which can help in preventing multiple trips back to the home improvement center.
| Once back from the home improvement center install the large thick rubber washer to the base of the threads on the new toilet tank fill valve.
Also read the installation instructions on the toilet tank fill valve replacement packaging to ensure that you have adjusted the height of the valve to the proper height. Then slide the replacement toilet tank fill valve assembly into the hole in the bottom of the toilet tank. |
 |
Use the new large plastic nut to secure it in place. The large plastic nut should mount to the threads on the underside of the toilet tank and should only be finger tightened. Avoid using pliers as you do not want to crack the porcelain tank.
After securing the replacement toilet tank fill valve to the toilet tank, reattach the supply line to the base of the tank. Before attaching the supply line nut, however, wrap some plumbers tape around the threads of the toilet tank fill valve. Also, again only finger tighten the supply line nut to the threads of the toilet tank fill valve.
| Next, attach the small flexible hose to the nipple located near the top of the toilet tank fill valve.
Connect the other side of the flexible hose to the top of the overflow pipe. Often there is a clip that attaches the hose to the top of the overflow pipe. Make sure to use it if one comes with the toilet tank fill valve replacement kit. |
|
If your particular toilet tank fill valve has a separate arm and float mechanism attach them to the toilet tank fill valve.
Finally turn the supply line valve back on and observe that the toilet tank fill valve fills up the tank appropriately before shutting off.
After the toilet tank fill valve has shut off, flush the toilet and again check to see if the toilet fills up properly and to the right level. Also inspect the nuts to make sure there are no leaks. If there are leaks, tighten up the nuts a little more. If you need to use adjustable pliers make sure not to apply too much torque.
With the toilet flushing and filling properly again your toilet tank fill valve replacement project is complete. Put the lid back on the toilet and you’re done.
For information on installing a shower pan membrane liner for a ceramic tile shower, see the Shower Pan Membrane Liner Installation eBook from HomeAdditionPlus.com. The Shower Pan Membrane Liner EBook will quickly teach you the step-by-step process for installing the shower pan membrane liner correctly. It includes instructions on framing the shower stall, pouring the pre-slope and shower base mortar, and installing the shower pan membrane liner.

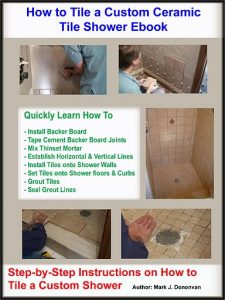
For information on how to tile a custom ceramic tile shower, see the “How to Tile a Custom Ceramic Tile Shower eBook” from HomeAdditionPlus.com. This eBook will quickly provide you with step-by-step instructions on how to measure and install ceramic tile in a shower, including the installation of tile on shower walls, floors and curbs. It provides detailed instructions for every step in the process of tiling a custom ceramic tile shower and is loaded with instructional pictures!
Related Information on How to Repair Toilets, Fix Humming Toilets and More…
- How to Replace a Toilet
- How to Resolve a Humming Toilet Tank Fill Valve Problem
- How to Install a Toilet Tank Fill Valve Video
Additional Plumbing Resources from Amazon.com
 |
 |
Get Free Bathroom Remodeling Price Quotes with No Obligation!
Fill out our 3-5 minute quick and easy form, and receive a free price quote on a bathroom remodeling project from one of our pre-screened and licensed bathroom remodeling contractors. This process is free and there is no obligation to continue once you receive your bathroom addition price estimate.