Painting a Ceiling is an Easy DIY Project
By Mark J. Donovan
|
|
Painting a ceiling is often necessary due to stains that can occur on the ceiling over time. Whether it be water stains caused by a onetime leaking roof or a pan of boiling spaghetti sauce on the stove that bubbled up and splashed sauce on the ceiling, ceiling stains are annoying. To paint a ceiling all you need is a paint roller with an extension pole, a step ladder, a small 2 inch wide brush, a roller tray, a large drop cloth, painter tape, and a rag. For materials you’ll need primer and paint.
To paint a ceiling, start by removing as much furniture out of the room as possible, and preferably all of it. |
Then lay the drop cloth(s) on the floor. If you don’t have enough drop clothes to cover the entire floor place it in one corner of the room. This is where you’ll start your ceiling painting. Move the drop cloth as you continue to paint the ceiling.
Next, if you don’t plan to paint the walls, apply painters tape to the edge of the walls where they intersect the ceiling.
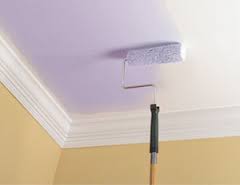
| Now, use your paint brush to apply primer to the first 2 to 3 inches of the outer edge of the ceiling. This process is known as cutting. Start in a corner of the room, where the drop cloth is placed, and cut 3 to 4 feet along each edge of the ceiling. Note that you should prime the ceiling first to hide any stains. By priming you can often avoid having to apply a second coat of more expensive paint.
Next attach the pole to your paint roller and apply primer to the ceiling in the area outlined by the 3 to 4 feet of cutting you did on the outer edge of the ceiling. You want to apply the field of primer while the cut primer is still wet. This will prevent visible line stains when the primer and paint dry. |
 |
When applying the primer to the ceiling with the paint roller, apply the primer filled roller in a zigzag pattern followed immediately by straight back and forth strokes. This will allow the primer to be spread most efficiently and prevent drying primer lines.
| Next continue to cut another 3 to 4 feet of ceiling near the ceiling edge with your 2 inch paint brush. Then continue to roll the primer onto the main area of the ceiling using the paint roller. Repeat this process until the entire ceiling is painted with paint primer.
After the primer has fully dried repeat the same exact process for applying the paint. Again, start by cutting in the corner of one section of the room and then follow right behind it with the paint roller filled with paint. Again, repeat this process until the entire ceiling is painted. |
 |
After the paint has dried look to see if the ceiling stains are completely masked. If not, apply a second coat of paint in the same manner. Then remove the painters tape from the wall / ceiling edges.
Lastly clean your paint brush, paint roller and paint tray with clean soapy warm water to wrap up the project.
See the Installing Interior Window Ebook from HomeAdditionPlus.com. The Installing Interior Window Trim Ebook provides easy to understand, step-by-step instructions, on how to install interior window trim around a window. Pictures are included for every key step in the process.
Related Information
Additional House Painting and Staining Resources from Amazon.com
 |
 |
Painting and Staining Price Quotes For FREE, No Obligation!
Fill out our 3-5 minute quick and easy form, and receive a free price quote on painting & staining from one of our pre-screened and licensed painting & staining contractors. This process is free and there is no obligation to continue once you receive your painting price estimate.