Learn How to Layout and Frame Walls
By Mark J. Donovan
|
|
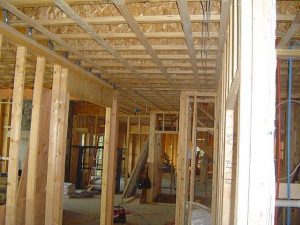
Framing walls is a fundamental skill that you need to master if you plan to build your own shed, home addition, or house. Framing walls is rough carpentry and typically involves assembling 2x4s or 2x6s in a specific manner to create a rough wall that drywall and exterior sheathing can be hung on.
Framed walls also are used for holding insulation and running electrical wiring and plumbing pipes through. In essence framed walls act as the skeletal structure of a home and provide much of its strength. |
There are two ways to frame walls. The most common way to construct framed walls is down on a level surface. Once a framed wall is constructed it is lifted and secured into place.
The other method of framing walls is known as stick framing. With this method the wall is framed vertically in place.
When laying out and framing walls it is important to understand both the desired finished dimensions of a room and the thicknesses of the wall studs and drywall. For example 2x4s have a width dimension of around 3-1/2 inches. Drywall has a thickness dimension of either 1/2 or 5/8 inches. So when building and positioning walls it is important to account for these structural dimensions when designing your home, shed, or home addition.
| When framing a wall it consists of three main components, a top and bottom plate and series of vertical wall studs. In addition, if window or doors are required in the wall, header plates and king and jack studs will be required. Also filler pieces, or cripple studs, are needed between door/window header plates and the top and bottom wall plates.
The vertical wall studs are typically spaced on either 16 or 24 inch centers, with 16 inch spacing being the most common. |
 |
This allows common 4’x8′ dimensional sheathing to easily break on the center of the wall studs and attach to them.
The easiest way to frame a wall is on the deck of the new home or home addition, near the location where it is to be positioned.
To layout and frame a wall cut two straight 2x4s (or 2x6s depending on how thick you want the wall) to the desired length of the wall. If the wall is very long you’ll need a second top plate to sister to the first top plate.
Place the two cut 2x4s parallel to one another and separated approximately the desired height of the wall. Now use your square to layout and mark where you’ll attach your vertical wall studs. Start on one side of the top plate and place the narrower width of the carpenter square 15-1/4 inches from the end of the top plate. You’ll need a tape measure for this. The square’s edge that is the closet to the end of the top plate is the leading edge of the first wall stud. Use a pencil and mark a line on the top plate on both sides of the square. Then remove your square and place an X in the area between the pencil marks. This is where you’ll place your wall stud and it will put the center of the wall stud at 16 inches from the end of the top plate.
The 16 inch on center wall studs that make up the remaining portion of the wall, and any cripple wall studs, can then be marked afterwards.
After marking up your top and bottom plates you can then cut to length your vertical stud members and then fasten them to the top and bottom plates using 16d common nails. Use two nails per wall stud to plate connection. Once the wall is framed you can then lift it into place. You’ll need at least another pair of hands to do this. Make sure the wall is level and square and then nail it to the deck. Also use a few spring boards to hold it in place while you build the other connecting walls. The spring boards should be nailed at about halfway up the framed wall and then positioned outwards at a diagonal and nailed to the deck.
For more help on building a home addition, see HomeAdditionPlus.com’s Home Addition Bid Sheets. Our Home Addition Bid Sheets provide you with the knowledge and information on how to plan a home building project, and what to look for when hiring contractors. They also include detailed cost breakdown tables and spreadsheets for estimating your own new home construction building costs.
Related Information
Additional Framing Resources from Amazon.com
 |
 |
Free Home Addition Price Quotes with No Obligation!
Fill out our 3-5 minute quick and easy form, and receive a free price quote on a house addition from one of our prescreened and licensed home addition contractors. This process is free and there is no obligation to continue once you receive your home addition price estimate.

