Wiring Instructions for Wiring One Switch to Control Two Lights
By Mark J. Donovan
|
|
A common residential wiring circuit found in many homes is two lights controlled from one switch. There are a variety of ways to wire this type of circuit, however I will focus on the case where power is fed from the main circuit panel into the single pole switch electrical box.
Warning – Household electricity can injure and even kill you if you come in contact with it. It is imperative that power be first turned off at the circuit breaker, and then tested at the switch and light fixtures to make sure they are indeed off prior to performing any electrical work on them. |
Typically either 14-2 or 12-2 Romex cable is used in these types of circuits. 14-2 Romex cable is used for 15 amp circuits and 12-2 Romex cable is used for 20 amp circuits.
Roughing in the Electrical Wiring
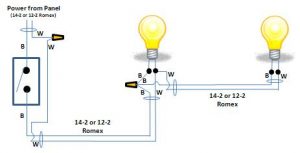
To rough in a circuit where two lights are controlled from one switch a Romex cable should first be fed from the panel into the light switch electrical box. This is your feed cable. A second Romex cable should be fed from the light switch to one of the light electrical boxes.
A third Romex cable should be fed between the two light electrical boxes. Learn how to pull Romex cable through a wall here.
| Wiring up the Switch Electrical Box
Connect the black wire from the feed cable to the brass screw on the single pole light switch. Connect the black wire coming from the light electrical box to the silver screw on the single pole light switch. Use a wire nut to connect the two white wires (return lines) together. |

Two Lights Operated off One Switch |
Finally, twist the two bare ground wires together using a “Greeny” wire nut. Note that one of the wires should protrude out the end of the “Greeny”. Fasten this bare ground wire to the green screw on the switch. Make sure that when attaching wires to screws that the wires are bent into a curved shape that are mounted in a clockwise position around the screws.
Wiring up the First Light Electrical Box
Using a wire nut, twist and connect the black wires from the two Romex cables together, along with a 5-6” pig tail (using just a length of black shielded wire extracted from a small length of spare Romex cable).
Attach the black pigtail to one side of the light circuit. (Note that the pig tail may not be necessary if you are directly wiring in a light fixture. In this particular situation the black light fixture wire should be twisted and connected together, via a wire nut, with the two black wires associated with the Romex cables.)
Watch the below video on wiring an electrical light socket.
|
|
Repeat the process for the White wires (return wires). Using a wire nut, twist and connect the white wires from the two Romex cables together, along with a 5-6” pig tail (using just a length of white shielded wire extracted from a small length of spare Romex cable).
Attach the white pigtail wire to the other side of the light circuit. (Note that the white wire pig tail may not be necessary if you are directly wiring in a light fixture. In this particular situation the white light fixture wire should be twisted and connected together, via a wire nut, with the two white wires associated with the Romex cables.)
| Finally, twist the two bare ground wires together using a “Greeny” wire nut. Again, one of the wires should protrude out the end of the “Greeny”. Fasten this bare ground wire to the green screw on the light fixture or onto the metal light chassis.
Wiring up the Second Light Electrical Box The second light electrical box is very easy to wire. Simply connect the black wire associated with the Romex cable to one side of the light fixture, and then the white wire associated with the Romex cable to the other side of the light fixture. Find a local electrical contractor here. Next, twist the two bare ground wires together using a “Greeny” wire nut. |

|
Again, one of the wires should protrude out the end of the “Greeny”. Fasten this bare ground wire to the green screw on the light fixture or onto the metal light chassis.
Once the electrical boxes and light fixtures have been wired up, fasten them into their respective electrical boxes and attach the switch cover plate to the electrical switch box.
Finally, install light bulbs into the light fixtures and then turn the power on to the new light circuit at the main circuit panel.
Want to add a dimmer switch to control your lights? Watch how to do so in this video on how to install a 3-way dimmer light switch or this article on installing a light dimmer switch.
For help on building a new custom home, see HomeAdditionPlus.com’s New Home Construction Bid Sheet. The New Home Construction Bid Sheet provides you with the knowledge on how to plan a custom home building project, and what to look for when hiring contractors for your new home construction. It also includes a detailed cost breakdown table and spreadsheet for estimating your own new home construction building costs.
 |
 |
Related Information
- 3-Way Light Switch Wiring Video
- Figuring Out Electrical Wiring of a Light Switch
- How to Change a Pull Chain Light Switch Lampholder Video
Additional Electrical Wiring Resources from Amazon.com
 |
 |
Free Home Addition Price Quotes with No Obligation!
Fill out our 3-5 minute quick and easy form, and receive a free price quote on a house addition from one of our prescreened and licensed home addition contractors. This process is free and there is no obligation to continue once you receive your house addition price estimate.
