Step by Step Instructions on Installing Attic stairs
By Mark J. Donovan
|
|
Installing retractable attic stairs is a great way to better access your home’s attic. Installing attic stairs however can be a little challenging for the average do-it-yourself homeowner, so think before you decide to act on this project. Installing attic stairs requires heavy lifting, working in the attic, cutting ceiling joists and framing. You will probably need the better part of a day to do this project.
Tools required
|
Materials required
- Attic Stair Kit
- Couple of large planks
- Two 24” long ledger boards (1”x3”) material
- Trim Moulding
- 1 1/2” Drywall Screws
- 3” Screws
- Paint
Roughing in Retractable Attic Stairs Opening
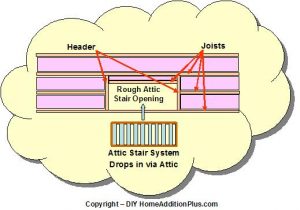
To begin with, go into your attic and locate roughly where you want to install your retractable attic stair system. It should be installed so that it runs parallel with the ceiling joists.
Once you have found the location for your attic stair system, remove the insulation from around the area where it is to be installed, and lay a few large planks down so that you can stand on them to work.
| Mark the rough opening length of the attic stairs onto the ceiling joists. Most likely you will need to cut one of the ceiling joists with a reciprocating saw to make an opening larger enough for the width of the attic stairs.
Next measure the length required for the headers that will tie the two far-end ceiling joists together, and enable you to fasten the cut ceiling joist to the headers. |
 |
Cut the headers and then install them into the rough opening using a screw gun and screws. Do not use a hammer and nails as this will potentially lead to cracking on your drywall ceiling below. Also, make sure you use a square to ensure the header is installed at 90 degree angles to the ceiling joists.
Now measure and mark on the headers the rough opening width requirement for the attic stairs. Cut a short joist to fit between the headers so that you can complete the rough opening required for the attic stairs. Again make sure it is square and use a screw gun to fasten the short joist to the headers.
Now fasten the two 24” long 1”x3” ledger boards on the near and far-end of the rough opening. Use 3” screws to fasten the ledger board up through the drywall and into the framing material of the rough opening. The ledger boards will be used to support the weight of the retractable attic stair system when you lay it in place via the attic.
| Install the Retractable Attic Stair System
Now, via the attic, place the attic stair system into the rough opening. Again, the attic stair system will sit on the ledger boards. Once in place, shim the retractable attic stair system so that it is square, and then fasten the attic stairs to the headers and joists using the screws provided with the attic stair system kit. Trim Out and Paint the Attic Stair System Now, on the lower level, remove the ledger boards and install trim moulding around the perimeter of the attic stairs. |
|
Finally, apply paint to the attic stair door and your attic stair installation project is complete.
For help on Attic Conversion and Attic Renovation Projects, see HomeAdditionPlus.com’s Attic Conversion Bid Sheet. The Attic Conversion Bid sheet will help to ensure that you hire the right contractor so that your attic conversion project is built correctly, on time and budget.
Related Information
Additional Attic Conversion and Home Remodeling Design Resources
 |
 |
Free Home Addition / Attic Conversion Price Quotes with No Obligation!
Fill out our 3-5 minute quick and easy form, and receive a free price quote on a attic conversion from one of our pre-screened and licensed home remodeling contractors. This process is free and there is no obligation to continue once you receive your attic conversion price estimate.

