Detailed Instructions on Installing a Mailbox Post and Mailbox
By Mark J. Donovan
|
|
Every so often, particularly after a bad winter, I need to replace our mailbox and mailbox post. Unfortunately snow plows occasionally wind up side swiping it with their plows, and if not all out taking the mailbox and post out, at least inflicting enough damage so that the mailbox and mailbox post are heavily damaged.
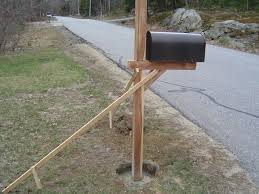
So this weekend was one of those times where I replaced the old mailbox post and mailbox. This time I chose, however, to use a pre-fabricated cedar mailbox post instead of the traditional pressure treated type. |
The cedar mailbox post looked better and I am hopeful it will last longer.
Described below are the instructions for setting a mailbox post and mailbox.
Required Mailbox Post and Mailbox Material
To begin the process of installing a new mailbox post and mailbox, visit your local home improvement store and buy a pre-fabricated 4×4 mailbox post and mailbox. Note that there are several different size mailboxes to choose from. Also pick up two 50lb bags of Quikrete redi-mix concrete. You will also need a ¾” thick board to mount the mailbox to. Finally you will need some screws, a couple of 1” x 3” x 6’ boards, and a couple of wooden stakes to secure the mailbox post while it is setting up.
Required Tools for Setting a Mailbox Post
|
 |
Removing Old Mailbox
The first step in installing a new mailbox post and mailbox involves removing the old mailbox post.
It is best to dig out around the mailbox post several inches and then push the post back and forth to loosen it up.
Then pull and drag the mailbox post out of the ground. This can be difficult to do and a second person may be necessary if the mailbox is set in concrete.
Once you have the old mailbox post out of the hole the real fun begins.
 |
 |
Required Mailbox Height and Setback Regulations
The United States Post Office has specific regulations on the height and placement relative to the road. In general the height of the bottom of the mailbox relative to the ground should be 41” to 45” high and the mailbox door should set back from the road 6-8 inches. It is best to check with your local postmaster, however, for your particular local requirements.
Installing the New Mailbox Post
With the old mailbox post, and associated concrete, removed from the ground, clear out the hole so that the hole is approximately 24” in depth. The width of the hole should be approximately 12” in diameter.
Place and center the new mailbox post into the hole.
| Next fasten the top end of one of the 1”x3”s to the side of the mailbox post with a screw. The board should attach to the post approximately 3’ off the ground.
Attach the second 1”x3” board to the adjacent side of the mailbox post in a similar manner. If done properly the two boards should sit perpendicular to one another and can be used to position the mailbox perfectly vertical. Use your level to make sure the mailbox post is perfectly level. |
|
Make sure the Mailbox Post is Level
Once level pound in a stake near each 1”x3” board and fasten each board to its relative stake using a screw and a screw gun. Again, just prior to installing each screw, confirm that the mailbox post is indeed perfectly vertical.
| Now pour a 50lb bag of Quikrete concrete mix into the hole and add 1 gallon of water. Using your shovel mix the concrete and water until it is fairly well blended. Pour in the second bag of Quickrete concrete mix and another gallon of water and mix again using your shovel.
Let the mailbox post setup over a 24 hour period. In the meantime, assemble the mailbox and label it accordingly with your street number and your name. |

|
Next, measure and cut the ¾” thick board so that it fits nicely into the bottom side of the mailbox.
After the mailbox post has set up, install the mailbox mounting board to the arm of the mailbox post, making sure you have it properly centered. Use several screws to make sure it is solidly mounted to the mailbox post arm.
Attaching Mailbox to Set Mailbox Post
Next attach the mailbox to the mailbox mounting board using 1 5/8” deck screws.
Back fill around the mailbox post with topsoil, reseed with grass and water, and with that your new mailbox post and mailbox are ready for use.
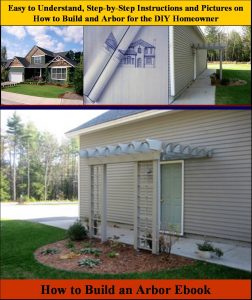
Dress Up Your Home’s Exterior with an Arbor – If you’ve always wondered what to do about a side door entrance to your house or garage to make it more appealing, or just wanted to simply spice up the backyard, building an arbor may be your answer. The “How to Build an Arbor Ebook” provides detailed, step-by-step instructions and pictures on how to build an entrance-way arbor for your home. Order and Immediately Download today!. 100% Money-Back Guarantee if you are not satisfied.
Planning to have a Brick or Paver Walkway Installed by a Landscaping Contractor but not sure what questions to ask to ensure you hire the right one? See HomeAdditionPlus.com’s Brick and Paver Walkway Bid Sheet. The Brick and Paver Walkway Bid Sheet will help ensure that your walkway project goes smoothly and you get the finished walkway you are looking for.

- Copper Mailboxes Provide Unique Beauty and Charm
- How to Install a Mailbox and Mailbox Post Video
- Heavy Duty Mailboxes
Additional Landscaping Resources from Amazon.com
 |
 |
Free Home Addition Price Quotes with No Obligation!
Fill out our 3-5 minute quick and easy form, and receive a free price quote on a house addition from one of our prescreened and licensed home addition contractors. This process is free and there is no obligation to continue once you receive your house addition price estimate.