A Slight Adjustment in the Toilet Flapper Setting Can Help Achieve a Better Flush
By Mark J. Donovan
|
|
Yesterday I changed out an old toilet flapper and flush valve in my toilet. The old pair were leaking and I just couldn’t seem to get a good seal between the flapper and valve. As a result the toilet was always slowly draining out.
So I went out and bought a Fluidmaster Toilet Flush Valve Kit yesterday and installed it. The installation was simple. How I Removed the Old Toilet Flush Valve I turned off the water supply valve to the toilet, flushed the toilet a couple of times to drain out most of the water, and then sopped up the remaining water in the toilet tank with a rag and a bucket. |
I then disconnected the flapper valve chain from the toilet handle arm. Then, I used a common screw driver and a wrench to remove the bolts that hold the toilet tank to the bowl.
After removing the bolts, I lifted the tank up off the bowl and laid it down carefully on a large towel in the bathroom. Next, I unscrewed the large white plastic nut that held the old toilet flush valve assembly to the toilet tank. Then I simply removed the old flush valve from the tank. I then cleaned the toilet bowl where the tank sits on it.
| How I Installed the new Toilet Flush Valve and Flapper
I then basically worked in reverse to install the new Fluidmaster Toilet Flush Valve Kit. First I installed the Fluidmaster Flush valve assembly into the toilet tank and secured it with the new large plastic white nut that came with it. Then I placed the large rubber gasket that came with the kit onto the toilet bowl, where the toilet tank sits on, and what the 2 inch wide toilet flush valve tube slides through and rests on. |
 |
Then I used the new bolts, washers and nuts to secure the toilet tank to the toilet bowl, making sure that I didn’t over-tighten the nuts and crack the tank or bowl.
I then attached the new toilet flapper to the flush valve and connected the chain that was attached to the flapper to the arm that is connected to the flush handle. I then reconnected the water supply line to the bottom of the toilet tank.
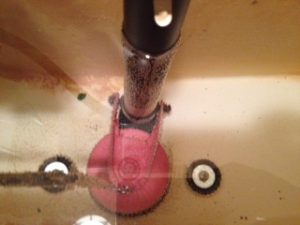
| Lastly I turned on the water supply valve to the toilet and watched the toilet fill. When the toilet tank fill valve turned off I flushed the toilet. I noticed that the toilet seemed to double flush. To resolve this problem I removed some of the slack in the toilet flapper chain such that there was only about ½ inch slack in it when the flapper was down.
Then, and a feature I had never seen before on a toilet flapper, I rotated the rubber flapper head a couple of notches to a different setting to cause the flapper to close more quickly. |
 |
I then allowed the toilet fill valve to complete re-filling the tank and tried flushing the toilet again. This time the toilet flushed properly. I got a good swirl in the water and all of the water emptied out of the toilet before the bowl began filling up again.
So if you buy a Fluidmaster toilet flush valve kit, make sure to adjust the flapper chain and the flapper setting itself to get the proper amount of flush. Again, I had never seen a flapper that could be “dialed-in” to adjust the amount of water that drained from the tank and into the toilet bowl.
For information on installing a shower pan membrane liner for a ceramic tile shower, see the Shower Pan Membrane Liner Installation eBook from HomeAdditionPlus.com. The Shower Pan Membrane Liner EBook will quickly teach you the step-by-step process for installing the shower pan membrane liner correctly. It includes instructions on framing the shower stall, pouring the pre-slope and shower base mortar, and installing the shower pan membrane liner.
For information on how to tile a custom ceramic tile shower, see the “How to Tile a Custom Ceramic Tile Shower eBook” from HomeAdditionPlus.com. This eBook will quickly provide you with step-by-step instructions on how to measure and install ceramic tile in a shower, including the installation of tile on shower walls, floors and curbs. It provides detailed instructions for every step in the process of tiling a custom ceramic tile shower and is loaded with instructional pictures!
Related Information
- How to Replace a Toilet Tank Flapper
- How to Install a Toilet in 5 Easy Steps
- How to Install a Toilet Tank Fill Valve Video
Additional Plumbing Resources from Amazon.com
 |
 |
Get Free Bathroom Remodeling Price Quotes with No Obligation!
Fill out our 3-5 minute quick and easy form, and receive a free price quote on a bathroom remodeling project from one of our pre-screened and licensed bathroom remodeling contractors. This process is free and there is no obligation to continue once you receive your bathroom addition price estimate.