How to Install Rolled Insulation and Achieve a Properly Insulated Home
By Mark J. Donovan
|
|
Rolled insulation is one of the most common types of insulation used in residential building. Installing rolled insulation is easy to do, however proper protective clothing attire is required. Rolled insulation comes in different R-Values and corresponding thicknesses. Rolled insulation also comes faced, and unfaced. Faced insulation has a paper covering on one side of it that acts as a vapor retarder. Rolled insulation is used in walls, ceilings, attics, and basements, and depending upon the application you may want to purchase face or unfaced rolled insulation.
The first step in installing rolled insulation is to determine how much you need. Simply grab your measuring tape and measure the wall, ceiling or attic area that you plan to install insulation in. |
Take for an example installing rolled insulation in the exterior walls of a new room addition. Simply measure the height and width of the walls to determine the amount of square feet of insulation required. An even easier technique is to measure the height of the walls and simply count the number of stud wall bays that you need to insulate. Rolled insulation is available for 16” and 24” stud bays, so by simply multiplying the number of stud bays times the height of the walls and then adding 5%, you can quickly determine the number of linear feet of insulation you need. The linear feet of rolled insulation per roll R-value type is listed on the packaging label, so you can quickly determine how many rolls you need.
| Rolled insulation is available in many different R-Values / thicknesses. The most common R-values for walls are R-11 (3.5” thick) and R-19 (6” thick). When installing rolled insulation in an attic, the thickness required is a function of the region of the country you live in, however using R-38 (12” thick) insulation in the attic is a common requirement.
Once you have purchased your insulation and are ready to install it, make sure to wear protective clothing that covers your body from head to toe. Rolled fiberglass insulation is irritating to the skin, throat, and eyes so also don’t forget to wear goggles, gloves, and a mask. |
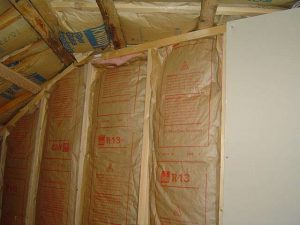 |
Note that when insulating a room, a vapor barrier needs to be installed over the insulation facing the inside of the room. This is automatically achieved with faced insulation. You simply install the faced insulation in the stud bays so that the paper faces inwards towards the room center. If you use unfaced insulation then you will need to apply a sheet of polyethylene plastic over all the walls and rolled insulation. The plastic can be stapled to the wall studs.
Tools required for Installing Rolled Insulation
To install rolled insulation you will need a long straight edge, such as a level or length of 2×4, a utility knife, a staple gun and staples, a putty knife and/or large common screw driver.
| Installing Rolled Insulation
The best way to install rolled insulation is to first unroll it on the floor, measure and cut it. After cutting a few lengths of insulation simply install them in the wall bays, again with the paper facing inwards towards the room. Staple the paper tabs to the wall stud studs every 12” or so up the length of each wall stud. Once you have installed the insulation in the wall bays, you can then proceed to cut small pieces of insulation and push them into the small crevices around the door and window frames, as well as any narrow bay walls. Use your screw driver and/or putty knife to push the pieces of insulation into the crevices and narrow wall bays. |
 |
Note as an alternative to using rolled insulation in the small crevices, you may want to use a can of spray foam insulation. This stuff works great and is much faster and easier to install then bits of rolled insulation.
Make sure when installing the rolled insulation around electrical boxes that you do a neat job and that you apply staples close to the electrical boxes to create a tight seal.
Finally, if you did not use a faced insulation, apply the plastic, or vapor retarder over the insulated walls. It is very important to do this to prevent moisture problems in the walls, so do not skip this step.
With the rolled insulation and vapor barrier installed you are ready to move on to the drywall installation phase of your home improvement project.
For help on building a home addition, see HomeAdditionPlus.com’s Home Addition Bid Sheets. Our Home Addition Bid Sheets provide you with the knowledge and information on how to plan a home addition project, and what to look for when hiring contractors. They also include detailed cost breakdown tables and spreadsheets for estimating your own new home addition building costs.
Related Information
- How to Properly Insulate a Garage
- Types of Home Insulation
- Installing Door and Window Foam Weatherstripping Video
Free Home Addition Price Quotes with No Obligation!
Fill out our 3-5 minute quick and easy form, and receive a free price quote on a house addition from one of our prescreened and licensed home addition contractors. This process is free and there is no obligation to continue once you receive your house addition price estimate.