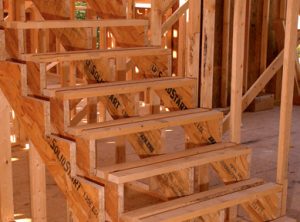
How to Fabricate Stair Stringers and use Proper Stair Riser Heights and Tread Widths
By Mark J. Donovan
|
|
One of the most difficult items to frame for the diy homeowner or even junior carpenter is a set of stairs. In particular, it is the stair stringers that are the most challenging to design and cut. Make a mistake with the stair rise and run design and you may wind up scrapping a very expensive piece of lumber. Stair stringers are normally cut out of long 2x12s that are very expensive. If you’re simply replacing an old stair case you can use one of the old stair stringers to trace a new set of rise and run marks on your 2x12s, however if you’re building a new deck or staircase in a home, then you have no choice but to learn to fabricate the stringers correctly the first time.
In regards to the tools necessary to make a pair of stair stringers all you need is a measuring tape, a framing square, a pencil, and a skill saw. Other than that, you just need to understand some basic math and how to use your framing square properly. |
The first item to determine when calculating the necessary stair rise and run for your stringers is the height of the top landing from the ground or lower level floor.
| Next, using a 7 to 8 inch step height range, divide the height that you just measured by the step height, e.g. the 7 or 8 inch number. So for example if the height measured was 80 inches and you divided by an 8 inch step you’ll calculate that you need 10 rises. In most cases you won’t get a perfect whole number using a 7 or 8 inch rise, so adjust your step height accordingly between 7 and 8 inches (e.g. 7.5 inches) so that you do arrive at an even amount of step rises.
The next fact to keep in mind is that there is one less tread required than risers. So in the example I just did, you would require 10 risers and 9 treads. Also, a 10 inch deep tread is fairly common so keep this number in mind. |
 |
So, when using a 2×12 piece of lumber you have 2 inches of material left in the lumber as you cut the 10 inch tread, thus preventing the stringer from becoming so narrow in places that it becomes fragile. This also provides a tread nosing overhang of 1-1/4 inch.
| Also, using a 10 inch deep tread helps to determine how much space the stair case will extend outwards. In my example above, with an 80 inch staircase height, the stair case would extend out 90 inches (10” tread X 9 treads).
So with the stair rise and run values determined, you can now trace the treads and risers onto one of your 2×12 pieces of lumber using your framing square, and then cut the lumber with a skill saw. After confirming the first stringer was cut properly you can then use it as a template to mark up and cut the other stair stringers. |
|
For more help on building a home addition, see HomeAdditionPlus.com’s Home Addition Bid Sheets. Our Home Addition Bid Sheets provide you with the knowledge and information on how to plan a home building project, and what to look for when hiring contractors. They also include detailed cost breakdown tables and spreadsheets for estimating your own new home construction building costs.
Related Information
- How to Attache Furring Strips to Concrete Walls
- Make Sure to Use Housewrap for Ensuring a Weather-tight Home
- Engineered Wood I-Beams versus Sawn Lumber for Floor Joists
Additional Framing Resources from Amazon.com
 |
 |
Free Home Addition Price Quotes with No Obligation!
Fill out our 3-5 minute quick and easy form, and receive a free price quote on a house addition from one of our prescreened and licensed home addition contractors. This process is free and there is no obligation to continue once you receive your home addition price estimate.
