Galvanized Joist Hangers are Commonly Used in Home and Deck Construction
By Mark J. Donovan
|
|
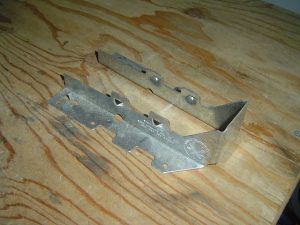
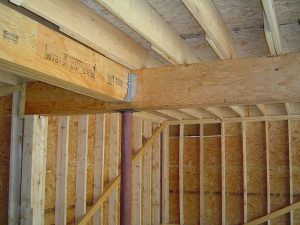
Joist hangers are galvanized metal brackets designed and shaped to connect floor joists or roof trusses to adjoining headers, support beams and ledger boards.
A galvanized joist hanger has many small holes in it to allow it to be easily fastened to floor joists, headers, support beams and ledger boards with nails. In addition, they typically come with small barbs, a.k.a. speed prongs, on them to allow them to be temporarily tacked into place prior to permanently fastening them with nails. |
Before the advent of joist hangers, carpenters had to toenail joists into header and support beams, which was a slow process and not as strong of a joining method. In addition to speeding up joist installation and providing a stronger joint, joist hangers also do a better job of preventing deck or floor joists from twisting and warping as they dry out.
Joist hangers come in a variety of shapes and sizes and it is important to purchase the right ones for the particular joists that you intend to hang.
Besides standard common faced galvanized joist hangers, there are also uniquely designed and angled joist hangers for special joining connections commonly required in certain roof designs. For ledger board edges there are also inverted flange joist hangers. In addition, there are also joist hangers specifically designed for highly corrosive salt environments, so if you live by the ocean or sea make sure to use these types of joist hangers.
 |
 |
Installing Joist Hangers
To properly install joist hangers temporarily toe nail the joist into place with a 16d nail.
Next, place the joist hanger around the joist and squeeze it tight up against the joist and the back of the header, beam or ledger board. Then tack it into place with your hammer by nailing in the speed prongs on the joist hanger.
| After tacking in the speed prongs, permanently fasten the joist hanger to the header/beam/ ledger board with 16d galvanized nails.
Make sure you put a nail into every nailing hole in the flat side of the joist hanger when securing it to the header/beam/ledger board. As an alternative approach to fastening the joist hangers to the header, beam or ledger board, you can simply nail the joist hangers in place along the length of the header, beam or ledger board and then slide the joists into place. |
 |
The only concern with this approach is making sure that the joist hangers are squeezed to the proper width of the joists. If left to wide, they will not snuggly fit around the floor joist and thus not provide as much strength. On the flip side, if they are squeezed to tight, the floor joists may not fit into them.
After securing the joist hanger to the header, beam or ledger board, and the joist is resting in the joist hanger use 1-1/2 inch long galvanized joist hanger nails to securely fasten the joist hanger to the joist. Again, do not leave any nail holes empty. If you are using a double wide joist hanger use 8d or 10d galvanized nails. If you are using double-shear joist hangers install the joist hanger nails in the pre-formed 45o angle nailing position holes.
For more help on building a home addition, see HomeAdditionPlus.com’s Home Addition Bid Sheets. Our Home Addition Bid Sheets provide you with the knowledge and information on how to plan a home building project, and what to look for when hiring contractors. They also include detailed cost breakdown tables and spreadsheets for estimating your own new home construction building costs.
Related Information
Additional Framing Resources from Amazon.com
 |
 |
Free Home Addition Price Quotes with No Obligation!
Fill out our 3-5 minute quick and easy form, and receive a free price quote on a house addition from one of our prescreened and licensed home addition contractors. This process is free and there is no obligation to continue once you receive your home addition price estimate.