The Three Key Steps for Staining a Deck Properly
By Mark J. Donovan
|
|
If your deck is looking worn and weathered, but for all other intents and purposes is in good shape, e.g. there is no significant rot, then it is probably time to stain the deck again. Deck staining is a project most do it yourself homeowners can perform however it is important to follow the three keys steps of staining a deck properly. The three steps of deck staining are selecting the appropriate stain, preparing the deck for stain, and actually applying the deck stain.
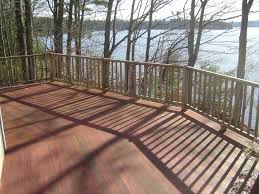
Choosing a Deck Stain There are basically three types of deck stains, or deck sealers you can choose from. There are clear deck stains, a.k.a. deck water sealers, solid stains or paints, and opaque or semi-transparent deck stains. |
Clear deck stains allow the color of the wood decking to show through, but need to be reapplied every year or two. Solid stains or paints can hide uneven wood grains and stains, however they wear poorly and should be applied annually.
Opaque or semi-transparent deck stains include some level of tint, however allow the deck wood grain to still show through. These types of stains have oils that penetrate into the wood decking and thus last longer before re-application is required. In addition, they fade, versus crack and peel, as is the case with solid stains and paints.
| Deck Stain Preparation
Deck stain preparation involves cleaning the deck surface, repairing sections of damaged decking, sinking all nails that may have popped up, and in some cases sanding the entire deck. To clean a deck surface it is best to apply a special deck cleaner solution that you spray onto the deck using a garden sprayer. These types of solutions are designed to remove mold and mildew as well as other types of dirt and stains. |
 |
After applying the deck cleaner solution, allow it to sit on the surface of the deck for 5-10 minutes then simply rinse it off with water. You may also want to use a broom to help clean hard spots. Use of a power washer can damage the wood grains of deck boards and thus is not recommended.
Next check the deck boards for any rot or loose nails. Replace the rotted deck boards and re-sink the deck nails. You may also want to apply new deck nails adjacent to the popped nails.
If cleaning the deck does not remove all of the stains, or the deck previously had a solid stain, paint or deck water sealer on it that has peeled, then you may have to sand the entire deck. Use an orbital floor sander to sand the bulk of the deck. A small palm sander can also help in corners or along the edges of the deck.
| Applying Deck Stain
Once the deck has been prepared for stain, it is now time to apply the deck stain. I find it best to use a thin napped roller or Lamb’s wool pad, along with a 4 inch and a 2 inch wide brush to apply the stain. The 4 inch brush is helpful for working the applied stain into the deck boards, and the 2 inch brush is helpful for getting into tight spaces. You can also use a sprayer to apply stain, however the roller or pad method works fairly fast, and I am not so sure it is worth the setup and clean up time of using a sprayer. |
 |
When staining a wood deck it is important to keep it going. You do not want to stop in the middle of the process. If you do you will end up seeing lap lines. In addition, you should only do 3 or 4 boards at a time.
Also, after applying stain to a new small section of the deck (e.g. 1 to 2 feet of linear deck board surface), back brush the area to help the deck stain blend in with the previously stained deck section. Again, this will help to get a solid blend of the stain. Back brushing is very important to do when using a roller, as a roller tends not to push the stain into the deck as well as a pad. In addition, a roller has the tendency to not apply the deck stain evenly.
| It is also important to work quickly when staining a deck and to make sure the weather forecast is expected to be clear and dry for at least 24 hours after applying the deck stain. You should also make sure the temperature is above 50 degrees Fahrenheit and that the relatively humidity is low.
Stain the deck edges first, before applying deck stain to the main deck area. When staining the deck boards it is important to not apply the deck stain too thick. If you do, make sure to brush the stain around so that it does not pool in areas or leave dark spots. If you apply the deck stain too thick you could wind up with areas of the deck that eventually peel. |
|
So to conclude, if you follow the three key steps in staining a deck as I have outlined you should be able to restore your deck surface to its original and beautiful look.
For help on building a deck, see HomeAdditionPlus.com’s Deck Installation Bid Sheet. The Deck Installation Bid Sheet will teach your how to hire the right deck contractor, and help to ensure that your deck project is completed on time and budget.
Related Information
- Instructions on Sanding a Wood Deck
- How to Seal a Deck
- Learn Why Flashing is So Critical When Building a Deck
- Redoing a Deck with Trex Select Decking
Additional Deck Building and Design Resources
 |
 |
Get Free Deck Building Price Quotes with No Obligation!
Fill out our 3-5 minute quick and easy form, and receive a free price quote on decks from one of our pre-screened and licensed deck contractors. This process is free and there is no obligation to continue once you receive your decks price estimate.