Restore the Beauty of your Wood Deck by Sanding it
By Mark J. Donovan
|
|
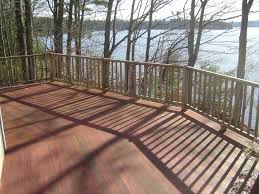
A couple of years back I applied a clear solution deck sealer on my Mahogany deck shortly before it rained. The fresh coat of deck sealer had only been on the deck a few hours before it began to rain. I quickly learned the impact of rushing a deck sealing project.
For several months I walked on a tacky deck. A year later the tackiness had abated but the deck was a permanent, ugly mess. To restore the deck to its original beauty I recently applied a deck cleaner solution to it and sanded the deck to remove the old deck sealer. |
Sanding a wood deck is a laborious and time consuming project, even with the right power tools. Initially I contemplated using a pole sander of some sort to remove the old deck sealer. However after a few phone calls and a visit to a home improvement center I quickly learned that I needed to use a floor sander.
The particular floor sander that I wound up renting was a large and extremely heavy orbital sander. It had a surface area of 12″x18″ and had a long arm handle that you used to control it. The sander came with a box of assorted sandpaper with different grit levels. The levels varied from 36 to 100. After experimenting with the finer grit sandpapers, I found that the 36 grit sandpaper, the coarsest sandpaper I was provided with, was the most appropriate for sanding a deck.
See my video on sanding a deck with a floor sander.
| To be honest, even coarser sandpaper such as 20 grit would have been more preferred, however the particular home improvement store that I rented the orbital floor sander from did not have any. Note that if you use one of these types of floor sanders on interior hardwood floors you will certainly want to use a finer grit sandpaper than 36 grit.
Wood Deck Sanding Preparation Prior to sanding the wood deck I first swept it and then applied a deck cleaner solution. |
 |
The deck cleaner solution removed the mold and mildew that had collected on the deck, however it really faded the deck out to almost a white color. In addition, I also checked the deck for any popped nails. It is absolutely imperative to make sure that all of the nails or screws are countersunk into the wood deck before using a floor sander on it.
If you do not countersink the nails/screws you will spend a fortune on sandpaper, possibly damage the floor sander and will not be able to properly sand the deck.
After the deck was thoroughly dry, I rented the orbital floor sander and began the painstakingly slow task of sanding the deck. To be honest, it only took a day to sand the entire deck. However, I ran the sander for about 8 solid hours to restore about 700 square feet of deck surface.
| How to Use a Floor Sander
Using an orbital floor sander is very straight forward. First place the sandpaper itself onto the floor. Make sure the grit side of the sand paper is placed onto the deck surface. Then place a 1″ thick nylon matting on top of the sandpaper. Next, tilt the floor sander back onto its wheels and roll it up to the edge of the sandpaper/matting sandwich stack. Tilt the floor sander back to its normal vertical position such that it rests on the nylon matting. |

Use this deck installation checklist and save time and money on your deck construction project. |
Pull the vertical locking pin and the floor sander is ready for use.
I have one word of caution before hitting the on switch. Wear work gloves and be prepared for the floor sander to have a mind of its own. It is similar to walking a large dog. It takes some energy to get the floor sander moving in the direction that you want, and it can occasionally pull itself in a direction that you were not planning to have it go. Simply put, watch your walls. Floor sanders can put some rather large dents in walls if not properly controlled.
| Due to the fact that the mahogany deck boards were slightly cupped I found that I needed to apply a new sheet of 36 grit sandpaper every 90-100 square feet of surface area.
My approach to sanding the deck was to work in small 100 square foot areas until the deck surface was restored to the level I was looking for. Due to the fact that the deck boards were slightly cupped I found myself having to make numerous passes at different angles to the deck boards to fully remove the old deck sealer. In addition, I made frequent stops and swept the deck of loose sawdust. |
|
Again, sanding the deck was a slow process and required an extensive amount of strength to control the sander. So be prepared to spend the better part of a day sanding your deck. However the work is worth the effort. I had seriously contemplated ripping up the mahogany decking and replacing it with composite decking. I am glad I decided against that route. My deck looks beautiful again, and this time I plan on sealing the deck with a mahogany colored stain that should really allow the deck to shine.
So before you decide to toss in the towel on your old wood deck, consider sanding it. You can save a fortune relative to having to replace the decking, and you will be pleasantly surprised on what’s lurking under that layer of mold, mildew and faded deck sealer.
For help on building a deck, see HomeAdditionPlus.com’s Deck Installation Bid Sheet. The Deck Installation Bid Sheet will teach your how to hire the right deck contractor, and help to ensure that your deck project is completed on time and budget.
Related Information
- How to Install Lattice around Deck Base Video
- How to Apply Deck Cleaner Video
- How to Sand a Wood Deck Video
Additional Deck Building and Design Resources
 |
 |
Get Free Deck Building Price Quotes with No Obligation!
Fill out our 3-5 minute quick and easy form, and receive a free price quote on decks from one of our pre-screened and licensed deck contractors. This process is free and there is no obligation to continue once you receive your decks price estimate.