Tiling a Kitchen Backsplash Weekend Project
By Mark J. Donovan
|
|
One way to improve the beauty of your kitchen is to tile behind the kitchen backsplash area.
Tiling a kitchen backsplash is the perfect diy project, however you need the right tools to achieve a professional job. Most importantly I highly recommend buying or renting a tile saw. A tile wet saw can dramatically speed up a kitchen backsplash tiling project and ensure you get perfect cuts every time. |
Tools Required for Tiling a Kitchen Backsplash
In addition to a tile wet saw, you’ll also need a level, hammer, tiling trowel with 1/8 inch grooves, tape measure, straight edge, rag, paper towels, sandpaper, pencil, and square.
Materials Required for Tiling a Kitchen Backsplash
Of course you’ll need tile, and in the ensuing project description and photos shown in this article I used 4”x4” Travertine tiles, along with a mesh strip of small glass tiles of assorted natural colors. I also used a tile adhesive versus a tile thinset mortar since the backsplash doesn’t get very wet, particularly since in my situation I had a 4 inch granite backsplash sitting on top of the granite countertops. Also, make sure to buy 1/8 inch spacers and wedges to help keep the tile straight while the adhesive cures. In addition, grab some newspaper and masking tape.
|
|
Preparing the Kitchen Backsplash for Tiling
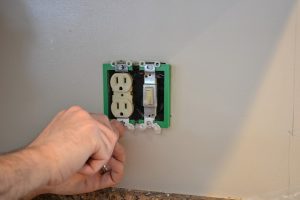
First remove everything from the kitchen countertop and turn off power to the electrical boxes that sit above the countertops. Next, remove the electrical box cover plates and attach electrical box extenders over the electrical boxes. This will ensure that the electrical outlets and switches are flush with the finished tile surface after installing the tiles. Finally, lay newspaper all over the kitchen countertops and tape them down where necessary.
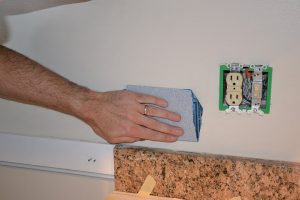
Next, using coarse grit sandpaper, e.g. 80 grit, sand the surface of the drywall backsplash area. You don’t need to remove the paint. You’re simply roughing up the surface so that the tile adhesive will bond well to the drywall surface. Make sure to wipe down the backsplash area with a moist rag after sanding it to remove any of the loose grit from the walls.
After preparing the backsplash surface for tile, find the center of your tile area using a tape measure and then use a level and a straight edge to form parallel and perpendicular lines. These lines will act as reference lines for installing your tiles.
Whenever possible try to design your tile layout pattern so that any cut tiles are hidden up underneath the kitchen cabinets and in the far corners of the kitchen backsplash area.
|
|
Time to Tile Kitchen Backsplash
Once the kitchen backsplash area is prepared, you can then begin applying the tile adhesive to the backsplash area. Apply it in small patches, e.g. just 2 to 3 square feet at a time, and use the notched trowel to create 1/8 inch grooves in it. Then, using your center reference lines as a starting point, begin to affix tiles to the kitchen backsplash area. If you have hard to reach places for applying the tile adhesive, back-butter the tiles with a thin layer of adhesive before placing them on the wall. Continue to work your way across the kitchen backsplash area one row at a time.
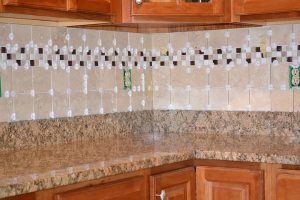
With my particular kitchen backsplash tile project I used 4”x4” Travertine tiles for the two bottom rows, followed by a 3 inch row of small colored glass tiles, and then finally capped off with one final row of 4”x4” tiles slightly trimmed at the top. I then used a few trim pieces to cap off the open ends of tiles. In addition, I used bull-nose tile on the sides that abutted a window area that looks into our family room.
If you are installing a unique mosaic pattern, lay the pattern out on the kitchen countertop before applying it to the wall. This way you can make sure you have all the necessary tiles before beginning the application of them to the wall.
As you install the tiles, make sure to apply 1/8 inch wedges along the bottom row, and then use the standard 1/8 inch tile spacers on the upper rows and columns of tile.
Tiling behind the Kitchen Stove
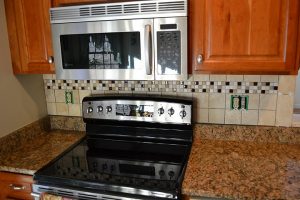
Tiling behind the kitchen stove presents its own unique issues. You don’t necessarily want to tile all the way down the wall behind the stove, however you want to tile enough so that no one can see gaps in the tile if they look on an angle to the stove. In my particular situation I attached a small ledger board that went parallel and evenly across the gap in the granite backsplash area. This way the first row of tiles over the stove area had something to rest on while the tile adhesive cured.
After the first row of tiles set up I then removed the ledger board and installed one additional row of tiles below the first row and into the stove area. I used tape to hold this particular row of tiles to the first row of tiles that had already set up from the day before.
After you’ve installed all the tiles, allow 24 to 48 hours for the tiles to set up before grouting them.
For information on installing a shower pan membrane liner for a ceramic tile shower, see the Shower Pan Membrane Liner Installation Ebook from HomeAdditionPlus.com. The Shower Pan Membrane Liner EBook will quickly teach you the step-by-step process for installing the shower pan membrane liner correctly. It includes instructions on framing the shower stall, pouring the pre-slope and shower base mortar, and installing the shower pan membrane liner.

See HomeAdditionPlus.com’s Ceramic Tile Calculator
See my “How to Tile a Custom Ceramic Tile Shower” Ebook to learn how to tile your own shower: For a detailed set of instructions on tiling a shower floor and walls, including pictures for every step in the process, see my “How to Tile Custom Ceramic Tile Shower Ebook”.
Related Information
Additional Ceramic Tile Resources from Amazon.com
 |
 |
 |
Get Free Bathroom Remodeling Price Quotes with No Obligation!
Fill out our 3-5 minute quick and easy form, and receive a free price quote on a bathroom remodeling project from one of our pre-screened and licensed bathroom remodeling contractors. This process is free and there is no obligation to continue once you receive your bathroom addition price estimate.