How to Change a Whole House Water Filter Cartridge
By Mark J. Donovan
|
|
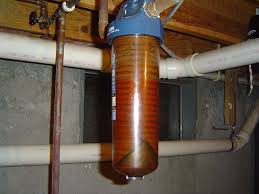
Whole house water filters are excellent for removing sediment and smells from your home’s water supply. However, water filter cartridge replacement is a necessary and regular maintenance task that must be performed with whole house water filters.
The frequency of water filter cartridge replacement is dependent upon the amount of sediment that is pulled up from the well and the amount of water that is used by the home. This said, expect to have to replace water filter cartridges with whole house water filters every 4 to 6 weeks. |
Water filter cartridge replacement begins with turning off the water valve that sits atop the whole house water filter. In addition, depending upon the model you may need to push a small button to relieve the water pressure in the system. However, before actually turning off the water fill a small pail with some water.
| Once the water has been turned off you can begin the actual water filter cartridge replacement task.
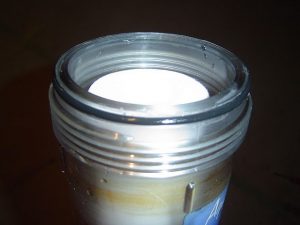
Unscrew the base of the whole house water filter until it disconnects from the top portion of the filter. Then remove the old water filter cartridge and dispose of it. Next, dump the remaining water and sediment contents of the water filter into a drain. Then use the pail of fresh water to rinse the base of the whole house water filter. Next remove the O-ring that is attached to the base unit. |
 |
Then, use an old clean rag to remove any residual sediment in the base of the whole house water filter. Make sure to clean the threads with the rag and to wipe any sediment off of the O-ring.
After cleaning the base unit, use a rag to clean the threads of the upper portion of the whole house water filter.
| Next, apply Vaseline to the O-ring and then reattach it to the base unit. The Vaseline helps to ensure the O-ring slides freely when the base unit is screwed back into the top portion of the whole house water filter.
Then install the replacement water filter cartridge into the base unit. Now screw the base unit to the top portion of the whole house water filter. Once the base unit is snug to the upper unit, turn the base unit another ¾ of a turn and then stop. |
 |
Slowly turn the valve back on to the water filter. By slowly turning on the whole house water filter air can be bled out of the water system so that you don’t hear it knocking around the supply line pipes when you turn on the faucets.
Wipe down the sidewalls of the whole house filter to eliminate any water on it, and inspect the filter for any leaks. With the water turned back on and no leaks observed, the water filter cartridge replacement task is complete.
For information on installing a shower pan membrane liner for a ceramic tile shower, see the Shower Pan Membrane Liner Installation eBook from HomeAdditionPlus.com. The Shower Pan Membrane Liner EBook will quickly teach you the step-by-step process for installing the shower pan membrane liner correctly. It includes instructions on framing the shower stall, pouring the pre-slope and shower base mortar, and installing the shower pan membrane liner.
For information on how to tile a custom ceramic tile shower, see the “How to Tile a Custom Ceramic Tile Shower eBook” from HomeAdditionPlus.com. This eBook will quickly provide you with step-by-step instructions on how to measure and install ceramic tile in a shower, including the installation of tile on shower walls, floors and curbs. It provides detailed instructions for every step in the process of tiling a custom ceramic tile shower and is loaded with instructional pictures!
Related Information
Additional Plumbing Resources from Amazon.com
 |
 |
Get Free Bathroom Remodeling Price Quotes with No Obligation!
Fill out our 3-5 minute quick and easy form, and receive a free price quote on a bathroom remodeling project from one of our pre-screened and licensed bathroom remodeling contractors. This process is free and there is no obligation to continue once you receive your bathroom addition price estimate.
