How to Purge Air from Heating System
By Mark J. Donovan
|
|
Recently I had an issue in my home where the upstairs heating system was not working. The heating system in my home is a hot water to hot air converter system. I called in an HVAC contractor and in about ten minutes he had identified the problem and had my upstairs heating system working again. What was the cause of the failure? Actually there were two reasons. First, air was in the hot water pipe that fed the attic heat exchanger, causing the circulator pump not to circulate water through the closed loop hot water heating system associated with the attic circuit.
Second, the water feeder valve was not working properly in the fact that it did not automatically allow more water into the closed looped heating circuit when it sensed a low pressure, e.g. below 15 PSI. |
The HVAC contractor explained to me that there was apparently a leak somewhere in my heating system that as a result slowly bled off pressure into the attic heating hot water circuit. Due to the amount of air in the hot water pipe the circulator pump simply couldn’t pump water through the circuit. Thus, no hot water was making it up into the attic heat exchanger.
| He also explained that the water feeder valve was not working properly. Because if it had, it would have automatically pumped more water into the hot water heating circuit to get the pressure up above 15 PSI.
To confirm his explanation of the problems to me, he first went up into the attic and loosened a nipple screw on a valve that fed the hot water into the heat exchanger. As he loosened the nipple screw we could hear air blowing out of the loosened nipple seal. |
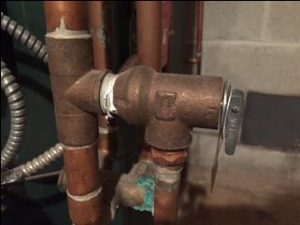 |
When water finally began to spew from the loosened nipple screw he tightened the nipple screw back up. Within seconds we could feel hot water circulating through the copper pipe. By purging air from the hot water supply pipe, he had restored water circulation to the attic heat exchanger.
| In the basement, the HVAC contractor showed me that the pressure in the hot water heating system was only at around 10 PSI. He lifted the small metal arm on the water feeder valve a little and I instantly heard water swooshing into the heating system hot water pipe. When the pressure gauge read 18 PSI he restored the metal arm on the water feeder valve back to its normal position. He commented that we didn’t want to let too much water into the heating system or else risk the pressure and temperature relief valve going off. He stated that that valve was set at 30 PSI.
After demonstrating how the water feeder valve operated we decided to have him replace the valve so that I wouldn’t have to worry about having too low water pressure in the heating system again in the event another small leak in the hot water heating circuit occurred. |
|
Lastly, in regards to the concern for a leak in the heating system, I explained to him that I had noticed a small leak dripping from a nipple screw on the heat exchanger in the basement during the summer. I told him I believe the leak had persisted for a couple of months before I resolved the issue by simply tightening the nipple screw. Consequently, after the HVAC contractor installed the new water feeder valve, the pressure in the hot water heating pipes remained constant and no water leaks were discovered.
For information on installing a shower pan membrane liner for a ceramic tile shower, see the Shower Pan Membrane Liner Installation eBook from HomeAdditionPlus.com. The Shower Pan Membrane Liner EBook will quickly teach you the step-by-step process for installing the shower pan membrane liner correctly. It includes instructions on framing the shower stall, pouring the pre-slope and shower base mortar, and installing the shower pan membrane liner.
For information on how to tile a custom ceramic tile shower, see the “How to Tile a Custom Ceramic Tile Shower eBook” from HomeAdditionPlus.com. This eBook will quickly provide you with step-by-step instructions on how to measure and install ceramic tile in a shower, including the installation of tile on shower walls, floors and curbs. It provides detailed instructions for every step in the process of tiling a custom ceramic tile shower and is loaded with instructional pictures!
Related Information
- How Hydronic Zone Valves Work Video
- Hot Water Circulator Pumps Video
- Hot Water Expansion Tanks Video
Additional Plumbing Resources from Amazon.com
 |
 |
Get Free Bathroom Remodeling Price Quotes with No Obligation!
Fill out our 3-5 minute quick and easy form, and receive a free price quote on a bathroom remodeling project from one of our pre-screened and licensed bathroom remodeling contractors. This process is free and there is no obligation to continue once you receive your bathroom addition price estimate.