How to Build a Solid Workbench Plans and Instructions
By Mark J. Donovan
|
|
If you have a shed, basement, or garage, then you need a solid workbench. You can either purchase from a home improvement store a pre-manufactured workbench, or you can build your own solid workbench.
In my experience you can build a workbench out of 2x4s and plywood in about an hour that will last longer and stand up to more abuse than anyone you can purchase from a store. Not to mention you can save some money in the process. |
Material Required for Building a Workbench out of 2x4s and Plywood
To build your own workbench you’ll need six 2x4s, eight feet in length, and one 4’x 8’ sheet of ½ inch thick plywood. You’ll also need 2.5”, 1.25” and 1.0” drywall/decking screws, and some carriage bolts.
Tools Required to Build a Solid Workbench out of 2x4s and Plywood
- Circular Skill Saw, such as the Black & Decker CS1030L 7-1/4-Inch 13 amp Laser Circular Saw with Soft Grips
- Table Saw, such as the DEWALT DW745 Heavy Duty 10-Inch Compact Job Site Table Saw with 16-Inch Max Rip Capacity
- Screw Gun, such as the DEWALT DC520KA Heavy Duty 18-Volt Ni-Cad Cordless Drywall/Deck Screwdriver Kit
- Hammer
- Drill Bits
- Square
Watch this video I filmed of me on how to build a workbench out of 2x4s and plywood.
How to Build a Workbench Plans and Instructions
To begin with you need a basic set of plans for building a workbench. Typically I like to build workbenches that are 4 to 6 feet in length and 2 feet in depth.
| Due to the fact that I’m tall, I typically like to have the legs 38” in height. Based on your personal height you may want to limit the leg height to 36”.
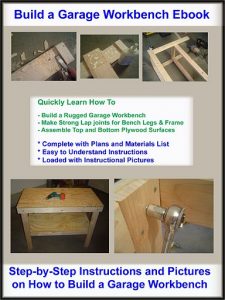
On a side note: If you want more detailed, step-by-step instructions, with accompanying pictures, for building a garage workbench see HomeAdditionPlus.com’s “Build a Garage Workbench Ebook“. |
 |
How to Cut the Top Frame Pieces of the Workbench
To begin building a workbench, start by making the equivalent of a 6’x2’ band constructed out of two 2x4s. This band represents the top framework of the workbench, being 6 feet in length and 2 feet in width.
Next, cut two of the eight foot 2x4s to 6 feet in length. Then trim the two remaining 2x4s stubs portions to 21 inches in length.
Now lay the 4 pieces on the garage or basement floor, standing on their narrow end, with the two 21 inch length pieces sitting in-between the two 6 foot pieces. After positioning the pieces in place, such that you create a rectangular band, draw a line with a pencil on the inside seams of the two longer boards. You’re defining where you will make cuts to create lap joints for the workbench legs.
| Next, measure 3.5” inward, from the lines that you previously drew, and make another series of straight lines. Put an X between each pair of lines. You should have two X’s on each 6 foot 2×4 piece. The spacing between each pair of marks should be 3.5”.
Now set your circular saw or table saw to 0.75” in depth, and make many cuts between each pair of lines. You should make cuts every 1/8th of an inch between the 3.5” inch marks. |
 |
Next, using a hammer, knock out the cut strips. Then use a chisel to smooth out the lap joints.
How to build Workbench 2×4 Legs
Now create 4 garage workbench legs by cutting two 8 foot 2x4s to your desired height. For example, if you want the finished height of the workbench to be 36” cut the workbench legs to 35.5 inches in length.
Again, at the top of each leg, measure down 3.5” and make a mark across the wide side of the 2×4 legs. Again, using your table saw or circular saw, make many 0.75” deep cuts between the end of the leg and the 3.5” line you drew. Do this for each leg of the workbench.
Assembling the Workbench 2×4 FrameUsing 2.5 inch drywall/deck screws, attach the four top frame pieces together. The two 21” length pieces should sit in-between the two 6 foot pieces. Next, attach the legs to the top frame piece. The top of each leg should sit flush with the top of the frame-top and should sit tightly into the lap joints. Use 1.25” drywall or decking screws to attach the legs to the top workbench frame. |
|
Put 3 screws into each lap joint. You may also want to apply some carpenters glue in each lap joint before attaching the legs. The lap joints should assure that the garage workbench will not rack.
How to Build the Workbench Mid-Frame Section
With the legs attached to the top frame assembly, stand the garage workbench up.
Now build another band of 2x4s that will reside on the inside edge of the legs. Attach the Mid-Frame assembly to the legs with 2.5” drywall/decking screws.
Install the Workbench Top
With the workbench frame complete, it is now time to install the workbench top. Rip (cut) a 25” wide strip of the 4’x8’ plywood. Then cut it to 6’1” in length, if you are building a 6 foot length workbench. This will create a workbench top that will have a ½ inch overlap over the top workbench frame.
Attach the workbench top to the top workbench frame using 1” drywall/decking screws. Apply the screws every 8” or so.
Install the Mid-Frame Plywood Section
Now measure the depth and length of the mid-frame section, and cut the remaining piece of plywood to these measurements. The mid-frame plywood section should be 21” x 72” if you followed all of the previous instructions correctly.
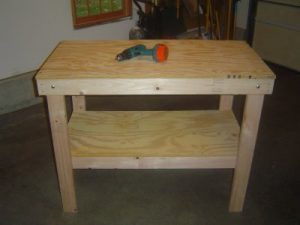
Finally, secure the mid-frame plywood section to the mid-frame section using 1” drywall/decking screws, and you have yourself a workbench.
For more information on building a workbench see the Build a Workbench Ebook from HomeAdditionPlus.com that I wrote. The “How to Build a Workbench with 2x4s and plywood” Ebook will show you how to build your own solid Workbench. It provides detailed, yet easy to understand, instructions and mechanical drawings for building a workbench with 2x4s and plywood, and pictures are included in every step of the build process. Order and Immediately Download today!
Related Information on How to Build a Workbench
- Now Install Shelving over your Garage Workbench
- Install Storage Cabinets in your Garage
- How to Install a Garage Door Opener
Free Garage Addition Price Quotes with No Obligation!
Fill out our 3-5 minute quick and easy form, and receive a free price quote on a garage addition from one of our prescreened and licensed garage addition contractors. This process is free and there is no obligation to continue once you receive your garage addition price estimate.

