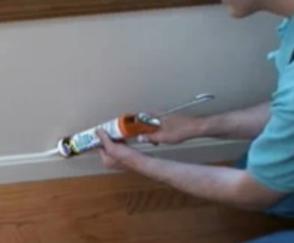
Tips for Caulking Baseboard Trim and achieving a Professional Wall Finish
By Mark J. Donovan
|
|
Caulking baseboard trim is necessary if you plan to paint the baseboard trim. Due to imperfections in the wall, small gaps between the top edge of the baseboard trim and the wall are common. These small gaps can make an otherwise beautiful wall seem unfinished or unsightly. By caulking the baseboard trim you can ensure a professionally finished baseboard trim project.
When caulking baseboard trim I like to use an acrylic latex caulk with silicone. This type of caulk is durable and flexible as well as easy to clean. You can find it at any home improvement store. |
Caulk is also available in a variety of colors, so pick a color that is most similar to your baseboard trim paint color.
After caulking a 4-6 foot length of baseboard trim, I immediately use my finger to slide along the length of the caulk bead. I then wipe the caulk bead down with a rung out damp paper towel or sponge to remove any excess caulk from the wall or baseboard trim.
| I continue in this process around the entire room caulking the baseboard trim.
When caulking baseboard trim, make sure you hold the caulk gun at an angle so that the tip of the caulk tube is flush with the top edge of the baseboard trim. Try to caulk in one fluid movement by applying a constant pressure to the caulk gun trigger. Make sure you don’t move the caulk gun too slowly or quickly, otherwise you will end up with excess caulk or voids in the baseboard trim. |
 |
After applying the caulk to the baseboard trim, I like to let it fully dry before applying paint to the baseboard trim. If you apply the paint while it is still wet, the paint bush will remove the caulk from the gap.
Dress Up Your Home with Crown Molding – For specific instructions on installing crown molding see the “Installing Crown Molding Ebook“. The “Installing Crown Molding Ebook” will show you how to properly measure, select, cut and install crown molding like a professional carpenter. It provides detailed instructions on every step in the process of installing crown molding and includes 28 instructional pictures! Order and Immediately Download today!. 100% Money-Back Guarantee if you are not satisfied.
For information on installing Window and Door trim see HomeAdditionPlus.com’s Installing Interior Window Trim Ebook and Installing Interior Door Trim Ebook. These Ebooks are loaded with pictures and provide easy to understand, step-by-step instructions, on how to install interior window and door trim.
Related Information
Additional Finish Carpentry Resources from Amazon.com
 |
 |
Free Home Addition Price Quotes with No Obligation!
Fill out our 3-5 minute quick and easy form, and receive a free price quote on a house addition from one of our prescreened and licensed home addition contractors. This process is free and there is no obligation to continue once you receive your house addition price estimate.

