Instructions on How to Install a Bathroom Vanity Cabinet
By Mark J. Donovan
|
|
A bathroom vanity install is one of the key components in a bathroom remodeling project. Installing a bathroom vanity is a relatively easy project to do for the do it yourself homeowner. The tools required for a bathroom vanity install include: screw gun, ¼” drill bit, jig saw, level, pencil, hammer, measuring tape and square. For materials you will need a few 2 – 2.5” screws, several 4d finish nails, and some shims.
To install a bathroom vanity first check to see if it has a complete backing on it. If it does, then you will need to cut out an area in the back of the bathroom vanity to allow the plumbing pipes to protrude into the bathroom vanity cabinet. |
Use your tape measure, pencil and square to determine and mark where to make the hole in the back of the bathroom vanity cabinet. Typically the hole is around 8” x 8”, and should allow room for the drain and supply lines to poke through.
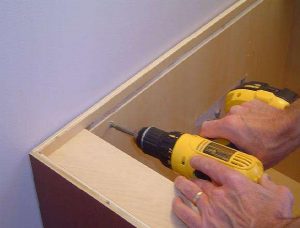
| Next, use your screw gun with the ¼” drill bit to place a few pilot holes in the area you marked on the back of the bathroom vanity cabinet.
Now, using your jigsaw, cut out the area you marked out on the back of the bathroom vanity cabinet. Use your level to check that the bathroom vanity cabinet is level. |
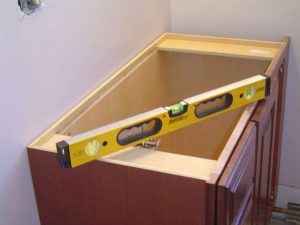 |
Use the level to check front to back and from side to side. If necessary install shims under the base of the cabinet, or along the backwall to square up the bathroom cabinet and to make it level.
| Once the bathroom vanity cabinet is level, you can now attach the bathroom vanity cabinet to the bathroom wall with screws. I prefer to use 4 screws for installing the bathroom vanity to the wall. Two in the top and two in the bottom at least 16 inches apart (the wall stud spacing width).
Make sure, however, that there are no plumbing pipes near the areas where you intend to place the screws. If a separate toe kickboard came with the bathroom vanity, cut it to the appropriate length and then attach it to the bottom of the bathroom vanity cabinet with some small finish nails and a hammer. |
 |
With the bathroom vanity installed, you can now move on to installing the bathroom countertop and sink.
For help on your bathroom remodeling project, see my Bathroom Remodeling Bid Sheet. The Bathroom Remodeling Bid Sheet provides a request for quote checklist section that you can provide to prospective bathroom remodeling contractors. It also includes a comprehensive bathroom remodeling cost breakdown table, in Microsoft Excel format, that allows the contractor to include his projected remodeling costs for every phase of the project.
Related Information
- Use this Bathroom Remodeling Checklist
- How to Install a Toilet
- Great Bathroom Remodeling Design Ideas
Additional Bathroom Remodeling Design Resources
 |
 |
Get Free Bathroom Remodeling Price Quotes with No Obligation!
Fill out our 3-5 minute quick and easy form, and receive a free price quote on bathroom remodeling from one of our prescreened and licensed bathroom remodeling contractors. This process is free and there is no obligation to continue once you receive your bathroom renovation price estimate.