Follow these Basic Steps for Installing your own Paver Walkway
By Mark J. Donovan
|
|
In this video Mark Donovan of HomeAdditionPlus.com shows how to install a stone paver walkway.
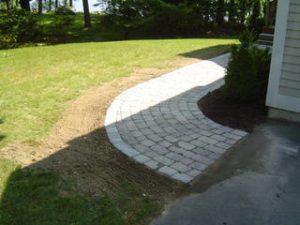
Installing a stone paver walkway yourself is not as difficult to do as you might think. For example, with certain stone paver patterns you can minimize the amount of cutting required. In my particular case no cutting of stone pavers was required. |
Also, if the base soil is already comprised of a sand/gravel mixture the amount of shoveling / site prep work can be minimized.
Again, in my case I only had a few inches of top soil to remove before I got to a sandy/gravelly base.
This said, I still removed a total of nine inches of material to form the bed for the installation of the stone paver walkway.
With the base complete I then screeded the surface of the stone dust using a couple of long copper pipes and a five foot long wood board. The copper pipes were placed on the far ends of the stone-dust base and tapped more than half their diameter into the stone dust. Then I ran the wood board along the top of the copper pipe rails, if you will, to create a level surface for placing the stone pavers.
| After screeding about a three foot long length of the walkway I placed the stone pavers onto the screeded stone dust surface, making sure in the process that I kept the rows of stone pavers straight.
I continued along in this manner for the entire length of the stone paver walkway. |
 |
Once I installed all of the pavers I then used a broom to brush in polymeric jointing sand in-between all of the paver joints. The polymer jointing sand helps to lock the stone pavers into place.
After brushing on the polymeric jointing sand I lightly sprayed water onto the walkway to activate the jointing sand.
With the walkway complete, all that is required is to backfill around the edges of the walkway with topsoil and finally grass seed.
Dress Up Your Home’s Exterior with an Arbor – If you’ve always wondered what to do about a side door entrance to your house or garage to make it more appealing, or just wanted to simply spice up the backyard, building an arbor may be your answer. The “How to Build an Arbor Ebook” provides detailed, step-by-step instructions and pictures on how to build an entrance-way arbor for your home. Order and Immediately Download today!. 100% Money-Back Guarantee if you are not satisfied.
Planning to have a Brick or Paver Walkway Installed by a Landscaping Contractor but not sure what questions to ask to ensure you hire the right one? See HomeAdditionPlus.com’s Brick and Paver Walkway Bid Sheet. The Brick and Paver Walkway Bid Sheet will help ensure that your walkway project goes smoothly and you get the finished walkway you are looking for.
Related Information
Additional Landscaping Resources from Amazon.com
 |
 |
Free Home Addition Price Quotes with No Obligation!
Fill out our 3-5 minute quick and easy form, and receive a free price quote on a house addition from one of our prescreened and licensed home addition contractors. This process is free and there is no obligation to continue once you receive your house addition price estimate.


