Unless Irreplaceable Antique Trim plan to Scrap Removed Baseboard Trim
By Mark J. Donovan
|
|
There are a couple of reasons why it is sometimes necessary to remove baseboard trim and replace it. First, over time baseboard trim can become nicked up by repeated hits by a vacuum cleaner and other objects. As a result it can become unsightly. Second, when installing new ceramic tile, hardwood floors or even new carpet, it is sometimes necessary and wise to remove old baseboard trim and replace it after the new floor has been installed. This way the old baseboard trim does not become “buried” in the floor.
Tools Required for Removing Baseboard Trim To remove baseboard trim you will need a claw hammer, nail punch, a pry bar, and a small flat piece of scrap wood, e.g. 2”x3”x ¼” piece of plywood. |
Removing Baseboard Trim
First, unless the baseboard trim is a treasured antique trim that you absolutely cannot find an equivalent replacement, don’t plan on reusing the old trim.
To begin the process of removing baseboard trim, use your hammer and nail punch to punch the finished nails through the majority of the baseboard would material.
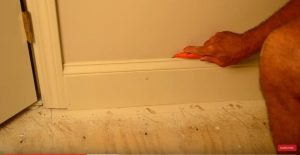
| Next, on one end of the baseboard trim piece, place your block of small wood just above the baseboard trim and then tap in your pry bar behind the upper edge of the baseboard trim. Use your hammer to tap in the pry bar.
Once you have tapped the pry bar behind the back top edge of the baseboard trim, pry the baseboard trim loose from the wall, using the small scrap board as leverage and for protecting the wall surface. |
 |
As you begin to pry and remove the baseboard trim away from the wall slide the pry bar down a few inches and continue to pry more of the baseboard trim away from the wall.
| After prying away the first couple of feet of baseboard trim with the pry bar use your hands, along with the pry bar, to pull and remove the entire length of baseboard trim.
Once you have removed the baseboard trim, immediately remove or bend over the nails that may have stayed with the trim piece. This will prevent the threat of stepping on a nail or catching a nail in the hand or face. It happens more often than you think. Next, use your claw hammer and the block of scrap wood to remove any nails that are still stuck in the wall. Again, use the block of wood as leverage to pry the nails out and to protect the surface of the wall. |
 |
Dress Up Your Home with Crown Molding – For specific instructions on installing crown molding see the “Installing Crown Molding Ebook“. The “Installing Crown Molding Ebook” will show you how to properly measure, select, cut and install crown molding like a professional carpenter. It provides detailed instructions on every step in the process of installing crown molding and includes 28 instructional pictures! Order and Immediately Download today!. 100% Money-Back Guarantee if you are not satisfied.
For information on installing Window and Door trim see HomeAdditionPlus.com’s Installing Interior Window Trim Ebook and Installing Interior Door Trim Ebook. These Ebooks are loaded with pictures and provide easy to understand, step-by-step instructions, on how to install interior window and door trim.
Related Information
- How to Install Baseboard Trim Video
- How to Install Beadboard Panels
- How to Install Wood Ceiling Panels
Additional Finish Carpentry Resources from Amazon.com
 |
 |
Free Home Addition Price Quotes with No Obligation!
Fill out our 3-5 minute quick and easy form, and receive a free price quote on a house addition from one of our prescreened and licensed home addition contractors. This process is free and there is no obligation to continue once you receive your house addition price estimate.