Instructions on How to Frame an Attic Conversion Project
By Mark J. Donovan
|
|
Converting your large attic space into a finished addition, such as a spare bedroom or home office is a great home remodeling project. However, it is important to remember that most attics are not necessarily structurally designed to support a new living space.
I would highly recommend that before embarking on an attic conversion project that you first develop detailed sketches and have them approved by your local building inspector. Key areas of interest to both you and the building inspector will be the size of the existing attic floor joists (lower level ceiling joists), the use of trusses in the roof construction, and the modification of any existing collar ties, braces and other structural roof members. |
It is important not to remove or modify existing collar ties, braces and other structural roof members without first getting building inspector approval. To do so could result in a dangerous compromise of the roof’s structural integrity.
Use Nail Gun on Attic Conversion Project
When framing an attic, I highly recommend the use of a nail gun, such as the BOSTITCH F21PL Round Head 1-1/2-Inch to 3-1/2-Inch Framing Nailer with Positive Placement Tip and Magnesium Housing, as the use of a hammer could disturb the lower level drywall ceilings.
| Attic Floor Construction
If the existing floor joists are deemed too small, the building inspector may require the sistering of larger floor joists to the existing ones. This process involves the nailing of larger ceiling floor joists to the existing ones. For the subflooring use 4×8 sheets of ¾” tongue and grooved plywood or Oriented Strand Board (OSB). They should be installed perpendicular to the floor joists. |
 |
Framing Attic Ceiling
When framing an attic addition and a flat ceiling is desired, at least for a portion of the room, collar ties will need to be attached between the roof rafters. Collar ties are cross members that connect roof rafters together. Collar ties should be constructed out of 2-by framing material.
In creating the flat attic ceiling it is important to make sure the collar ties are positioned at the same height from the attic floor, from roof rafter to roof rafter. The best way to do this is to use a chalk line and a 4 foot level.
| Start by measuring from the attic floor to the roof rafter for the desired attic ceiling height. Mark this location on a roof rafter at one end of the attic. Repeat the process at the far end of the attic addition. Now snap a chalk line between the points. You should end up with a reference line that runs across all of the roof rafters on one side of the future attic addition.
Repeat the process on the other side of the attic addition. Now you should have the reference lines on each side of the roof rafters to act as reference guides when installing the collar ties. This said, I additionally recommend the use of a 4 foot level to make sure the collar ties are level as you nail them to the roof rafters. Check collar tie to collar tie, as well as across each collar tie using the level. |

Use this room addition checklist and save time and money on your room addition project. |
Framing Attic Walls
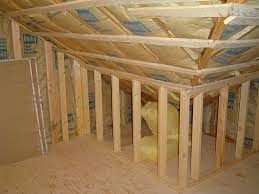
To frame the attic walls, it is best to build them on the attic floor and then stand them in place when they are done.
When framing an attic wall, sandwich 2×4 vertical stud members between top and bottom 2×4 plates. Then cap the top plate with an additional 2×4 for added wall strength. The stud spacing should be on 16” centers.
When cutting the 2×4 vertical studs, transfer the roof pitch onto one end of the studs. This angled cut will be positioned such that it forms the top of the wall. The top plate and cap plate will nail to these angled cuts. The bottom plate will nail to the 90 degree cut.
Boxing in Chimney, Vents and other Obstruction Areas
Inevitably you will need to box in around items such as a chimney, vents and other obstruction areas. It is best to develop an attic conversion plan that integrates these obstructions into closet areas or unfinished areas.
For more help on building a home addition, see HomeAdditionPlus.com’s Home Addition Bid Sheets. Our Home Addition Bid Sheets provide you with the knowledge and information on how to plan a home building project, and what to look for when hiring contractors. They also include detailed cost breakdown tables and spreadsheets for estimating your own new home construction building costs.
Related Information
Additional Framing Resources from Amazon.com
 |
 |
Free Home Addition Price Quotes with No Obligation!
Fill out our 3-5 minute quick and easy form, and receive a free price quote on a house addition from one of our prescreened and licensed home addition contractors. This process is free and there is no obligation to continue once you receive your home addition price estimate.
